Page 1 of 5
Tech 1 Sport resto - Update 26/4!!
Posted: Tue Aug 21, 2007 11:45 pm
by Pad
Hi,
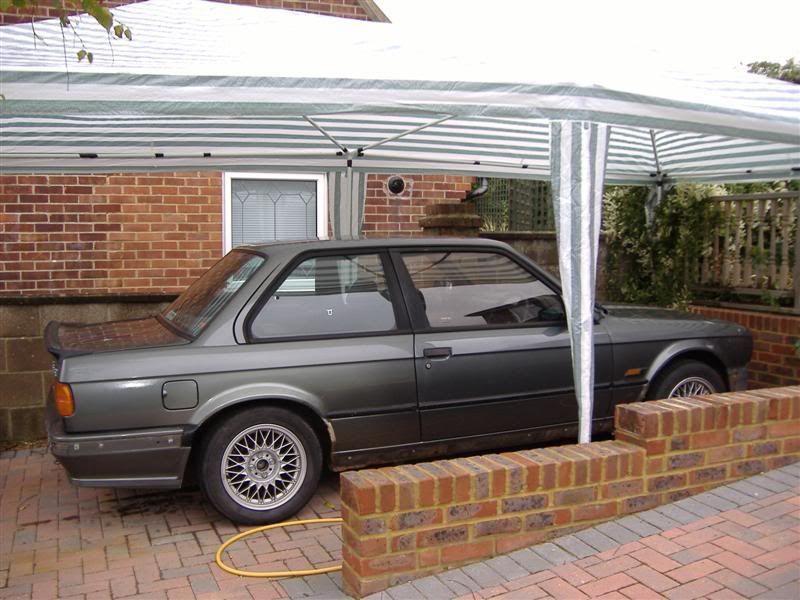
You may remember a couple of months ago I posted up some pics of a dog of an e30 I have picked up. Well, Ive got a week off work so what better time to get stuck in and start getting it sorted.
The plan for this one is to get it looking proper again, not concours but hopefully one of the best, usable tech1s around. It will all be done original, a full paint job will be required.
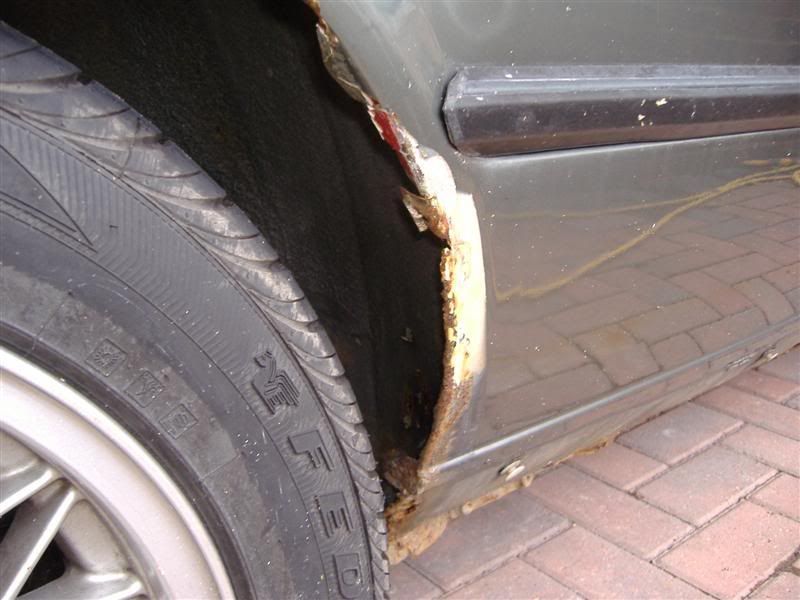
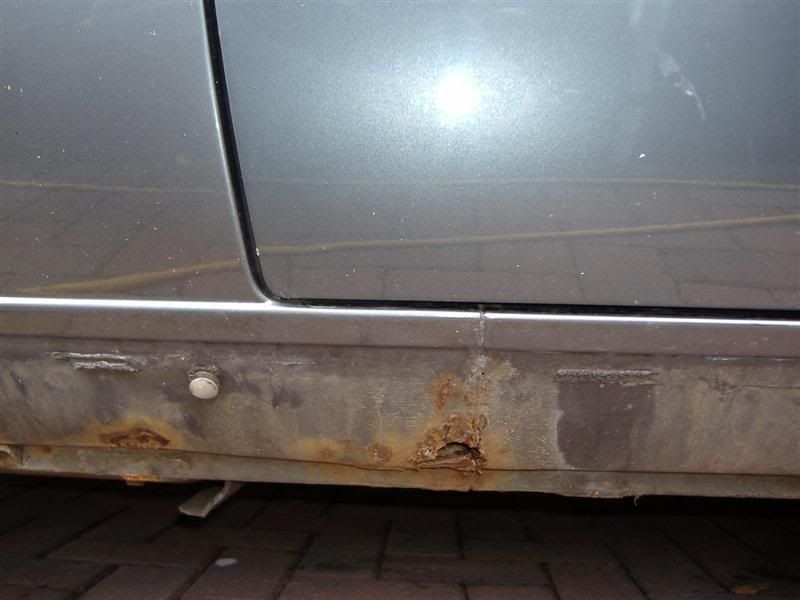
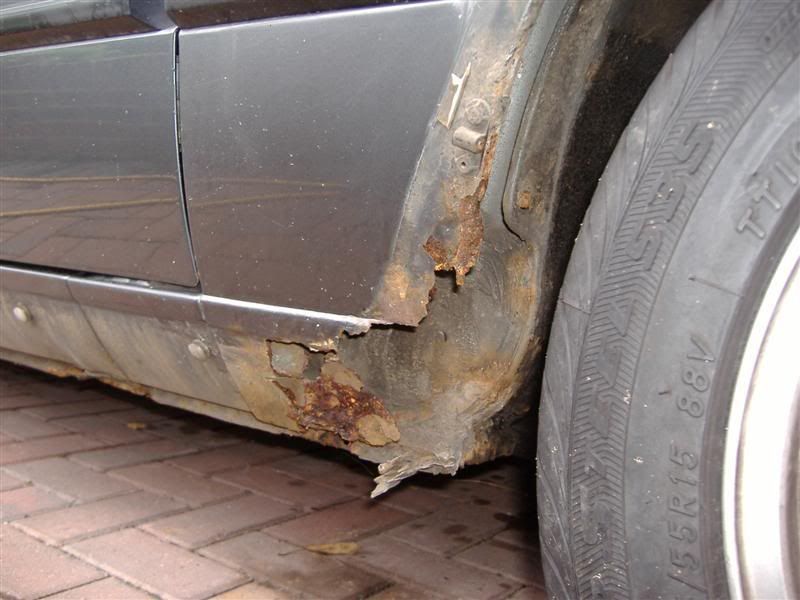
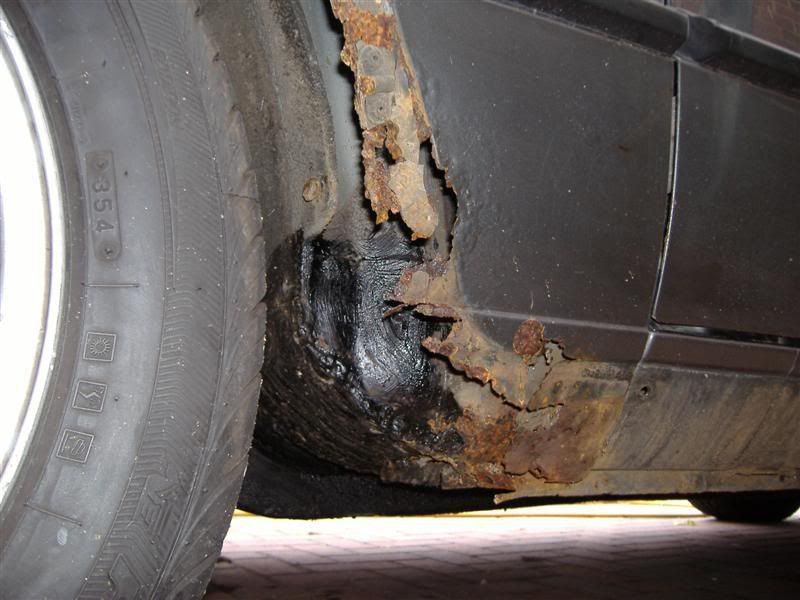
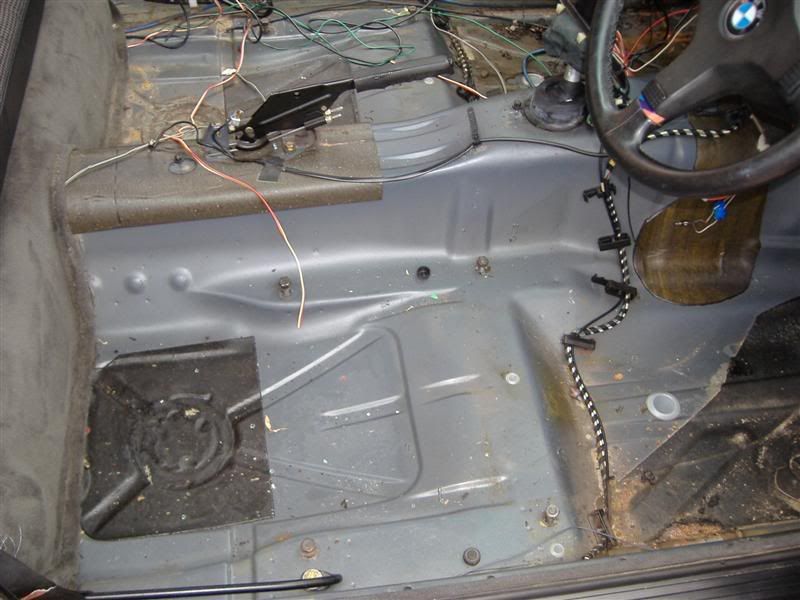
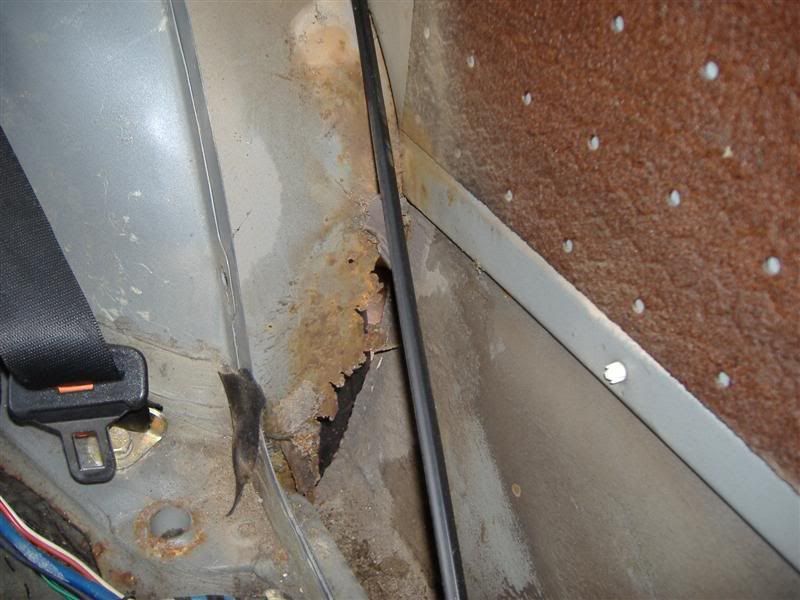
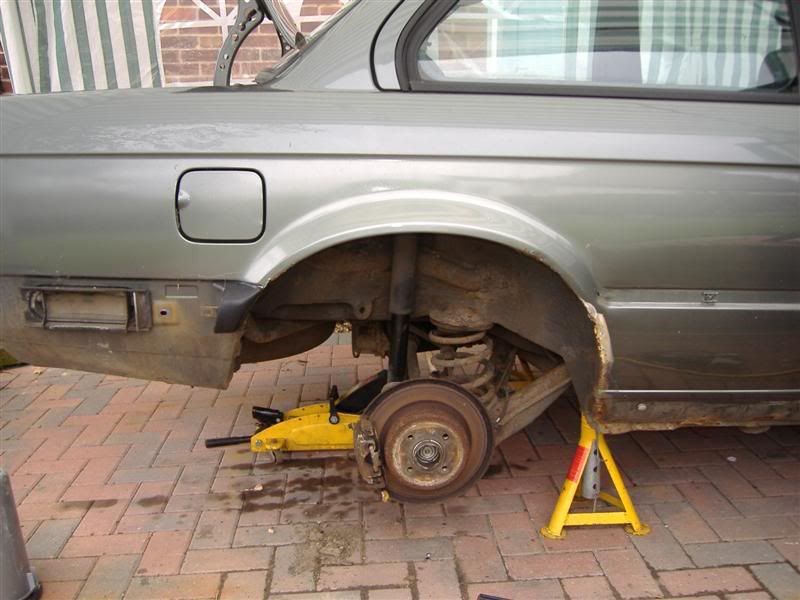
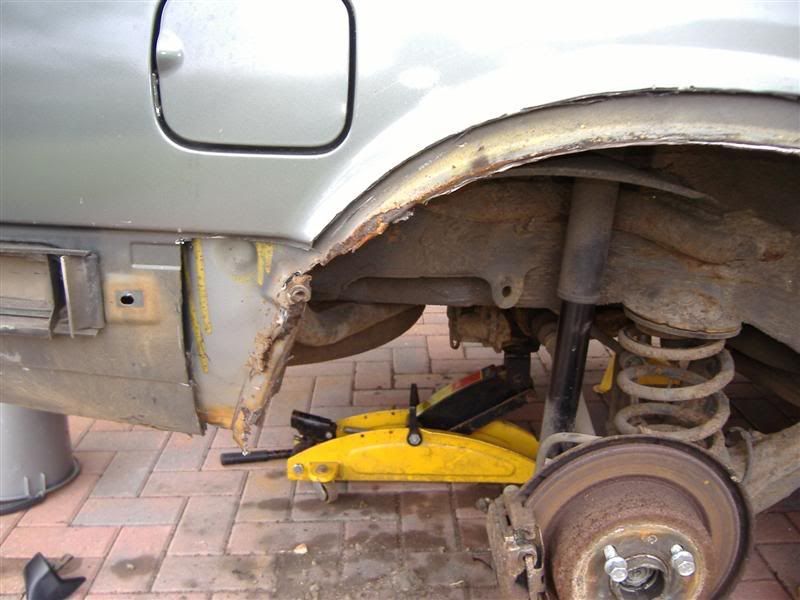
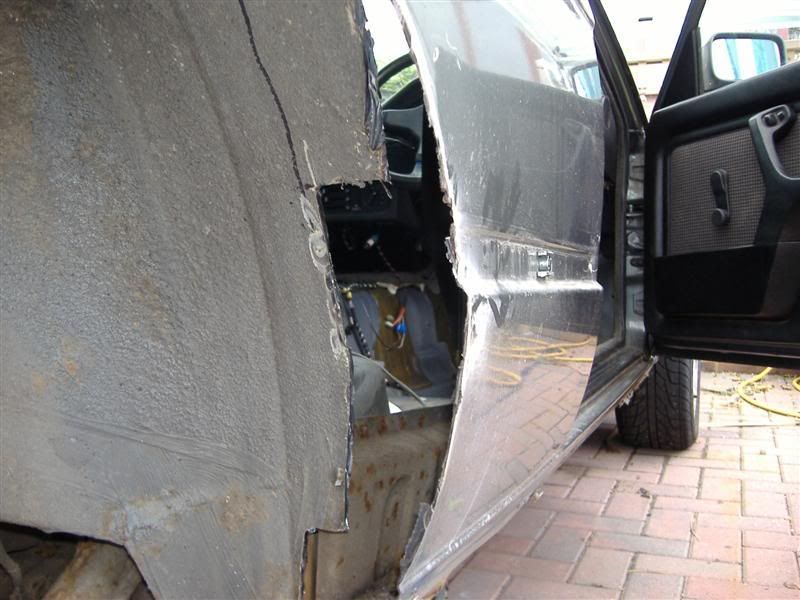
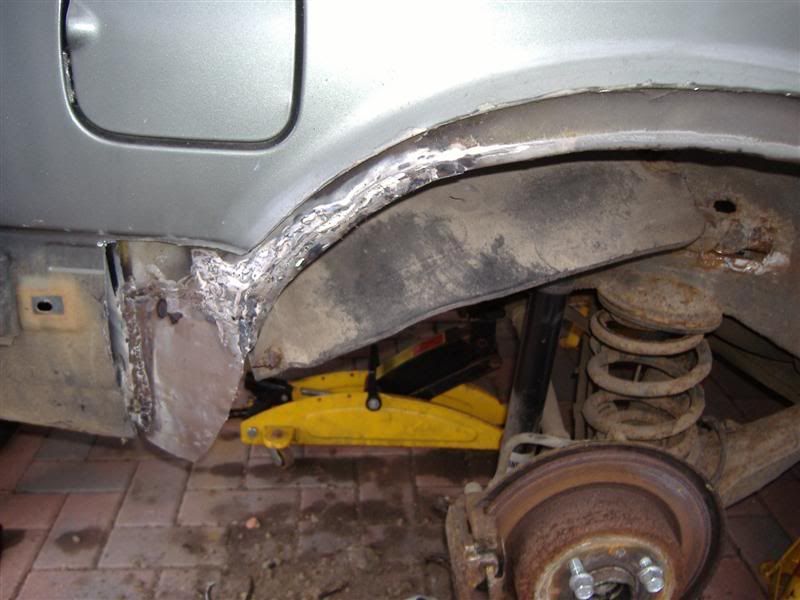
So, here goes - today was the easy bit, stripping it. Some photos of the bad bits...

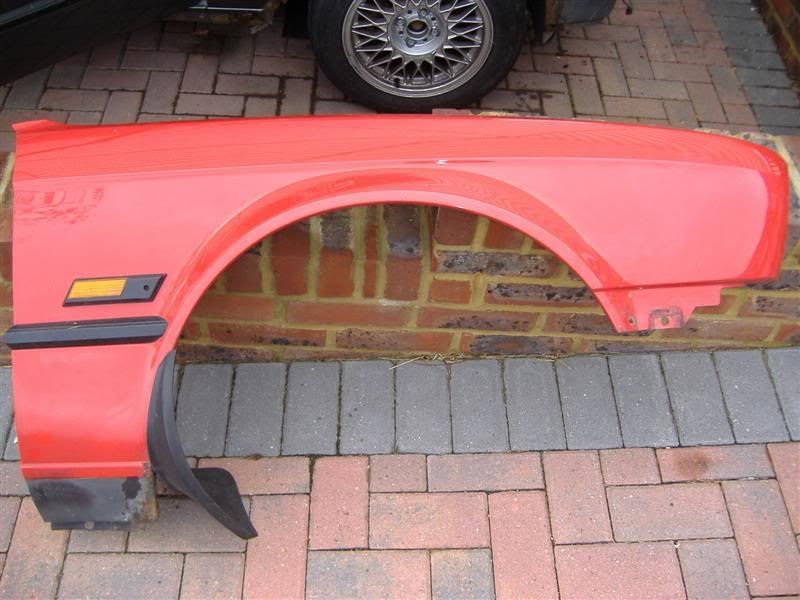
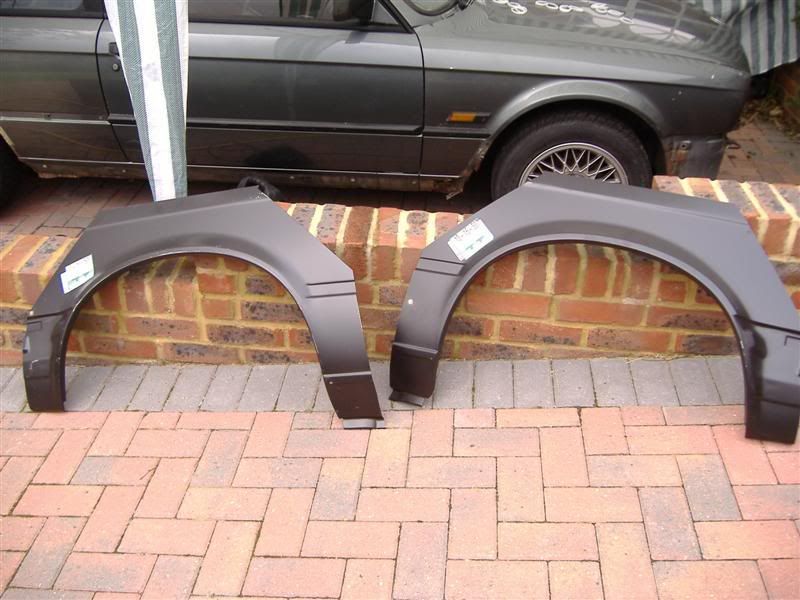
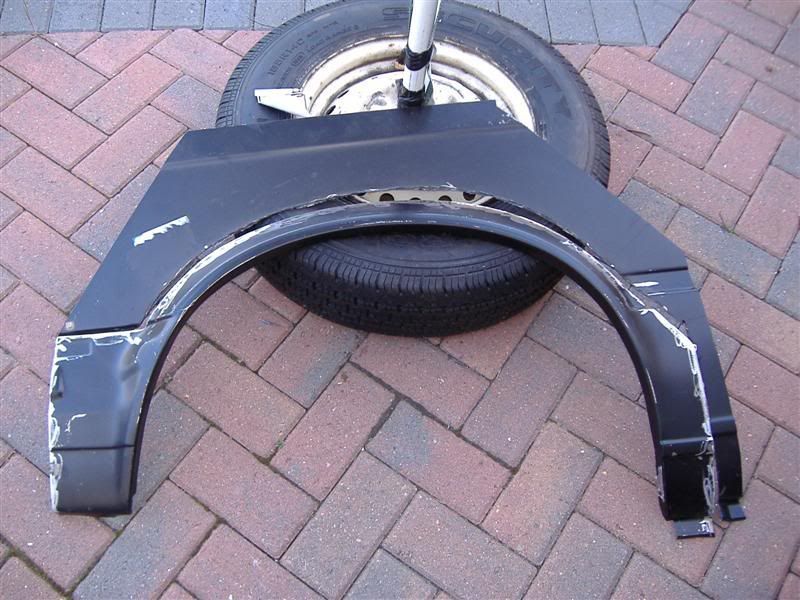
some replacemnt parts sourced....
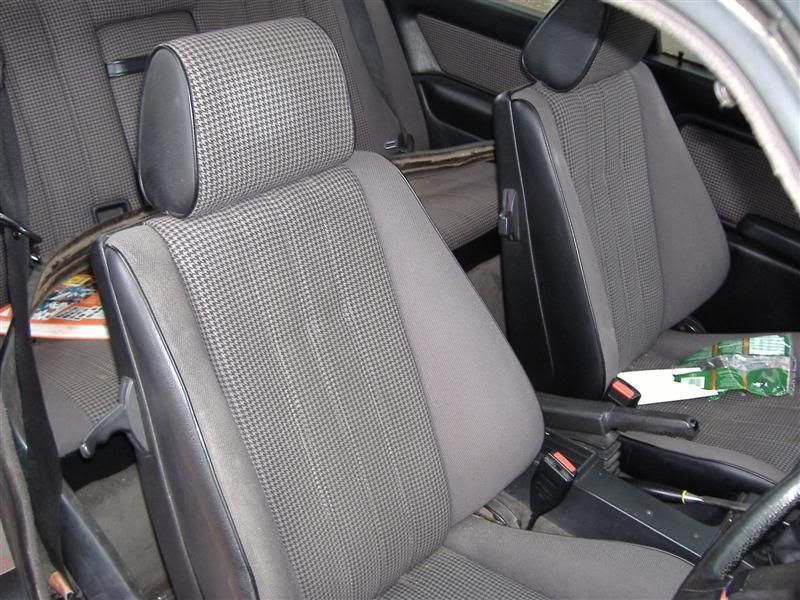
interior dirty but in excellent nick - will look the business when George has been at it..
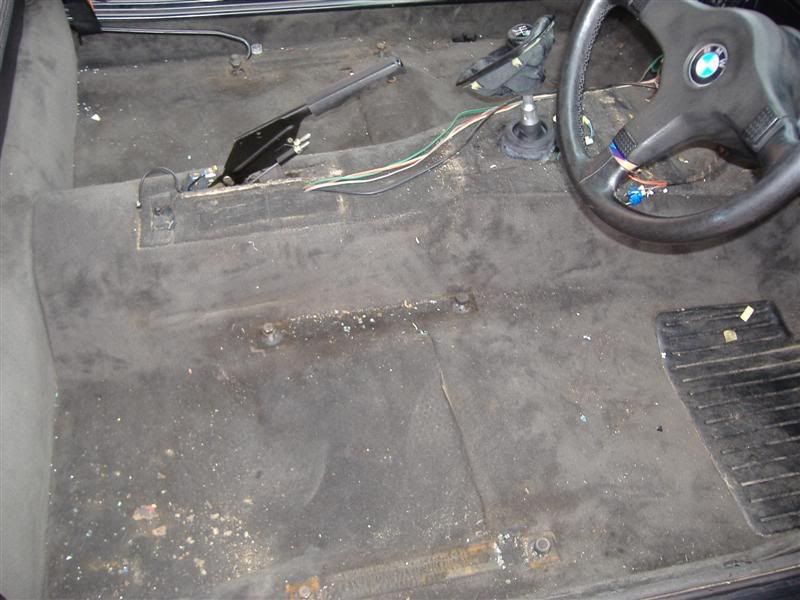
carpet out, not too bad but evidevce of some prevoius attempts to pass mot...
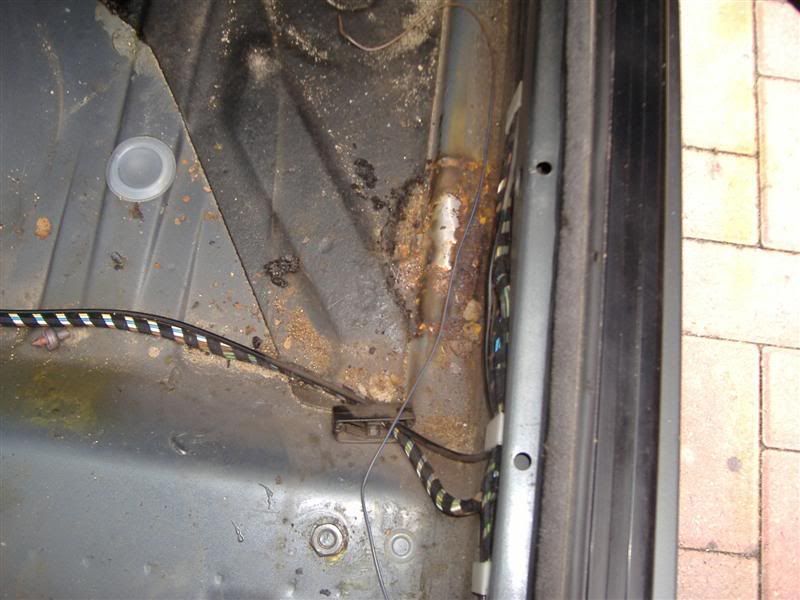
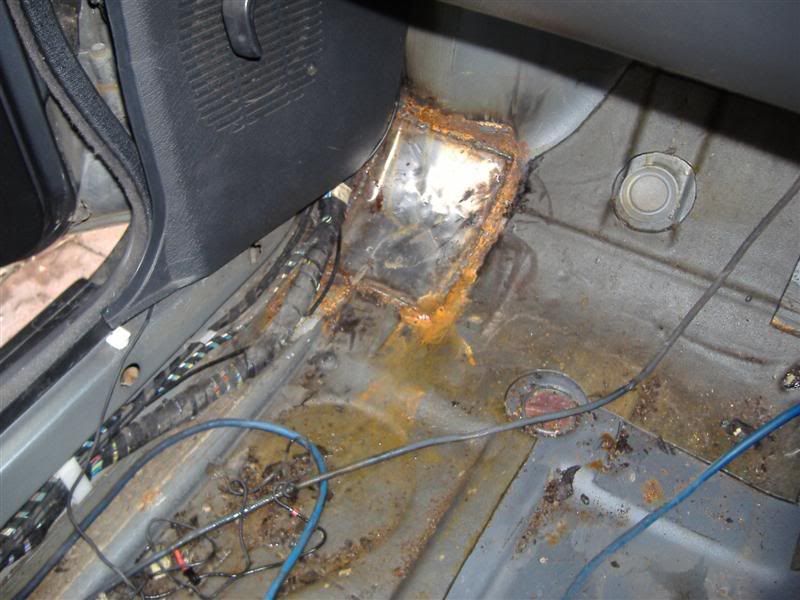
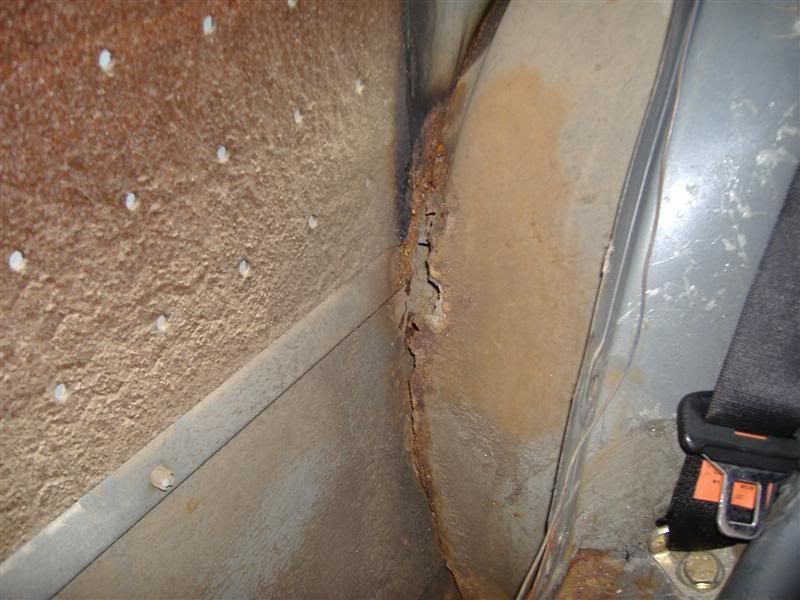
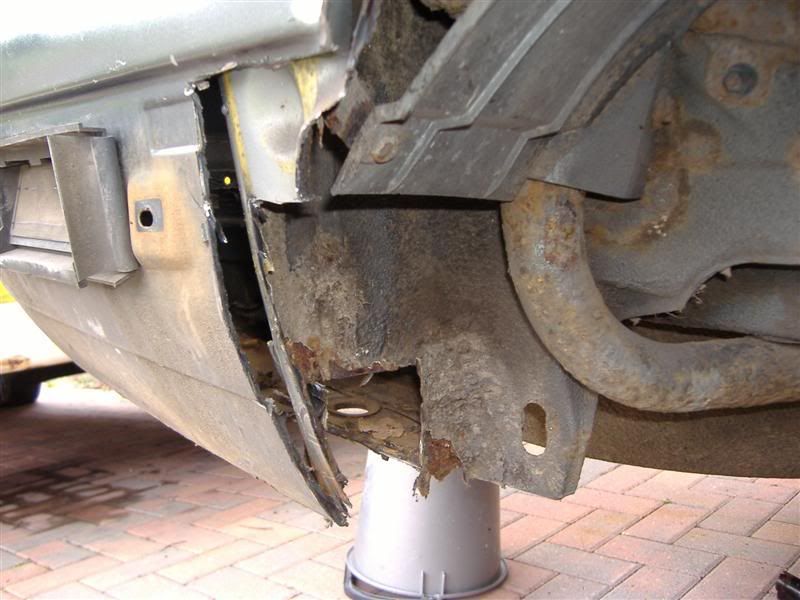
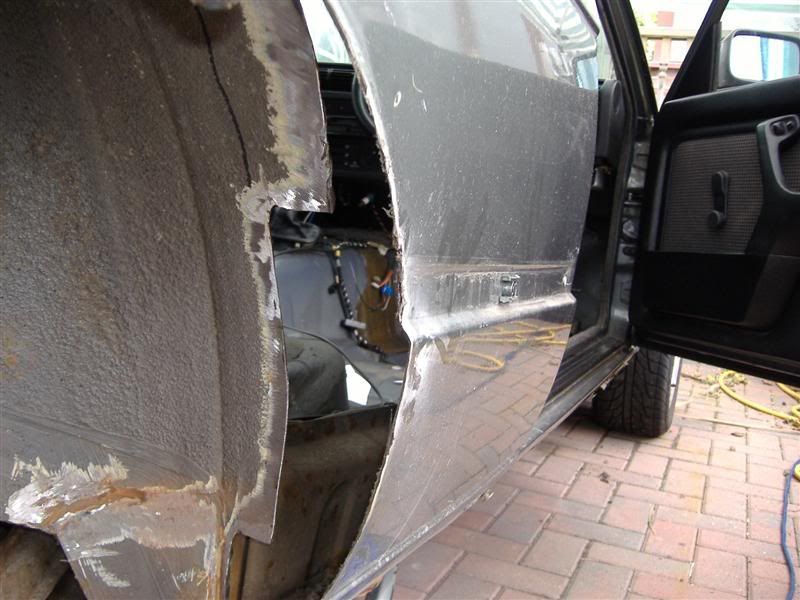
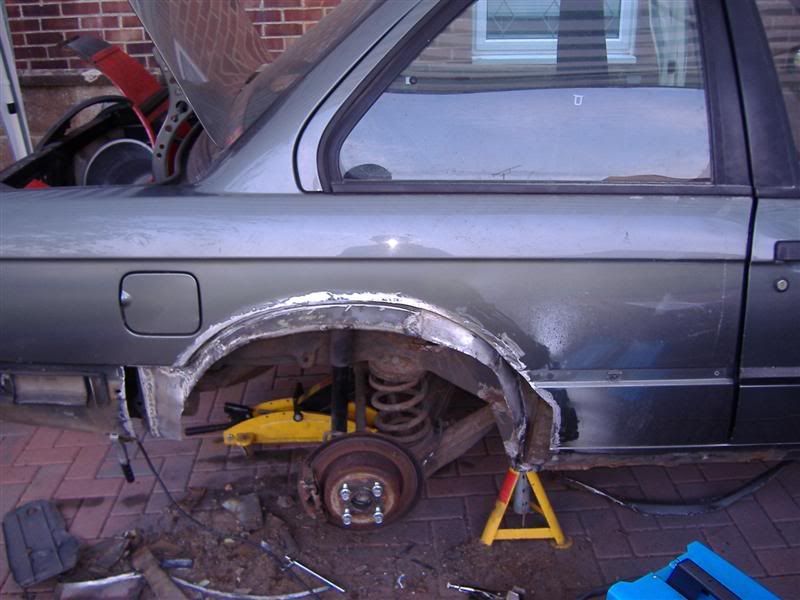
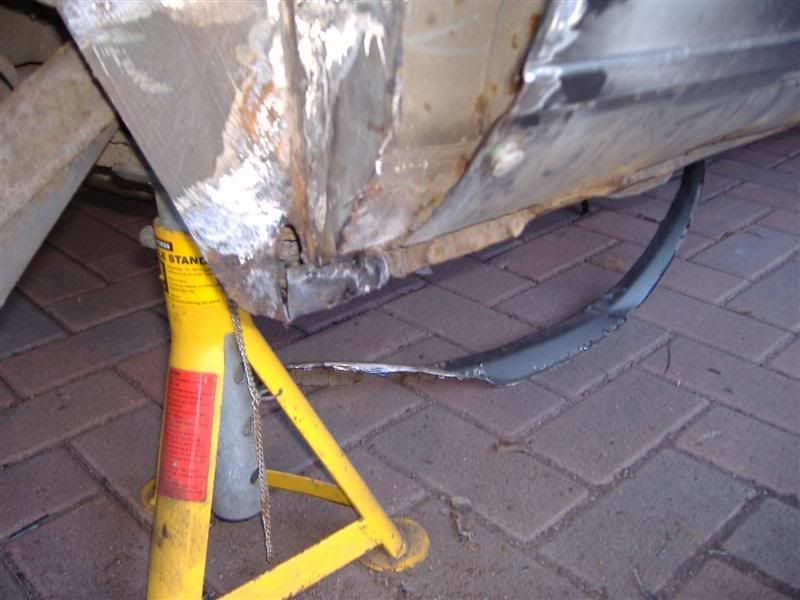
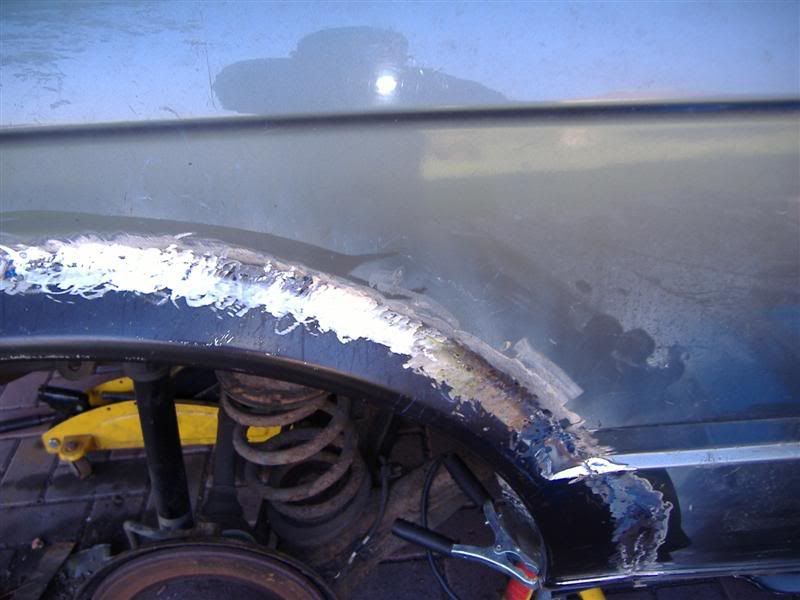
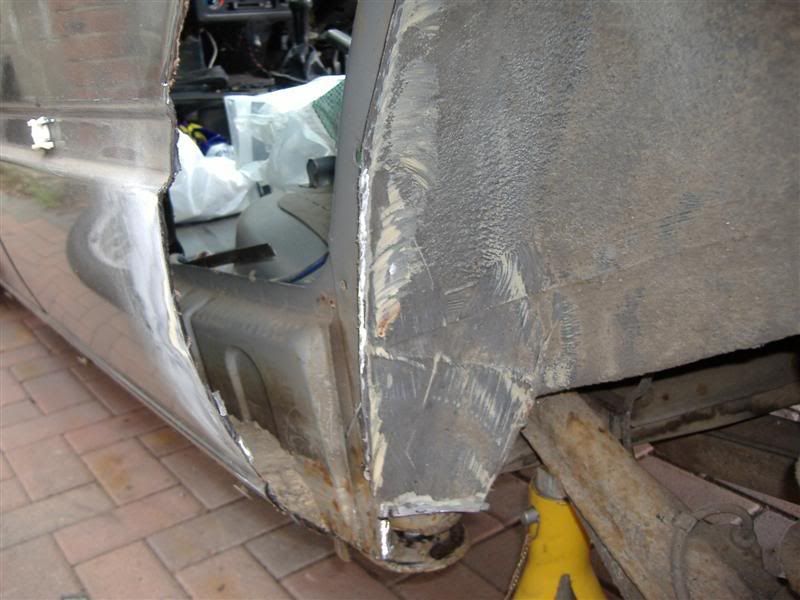
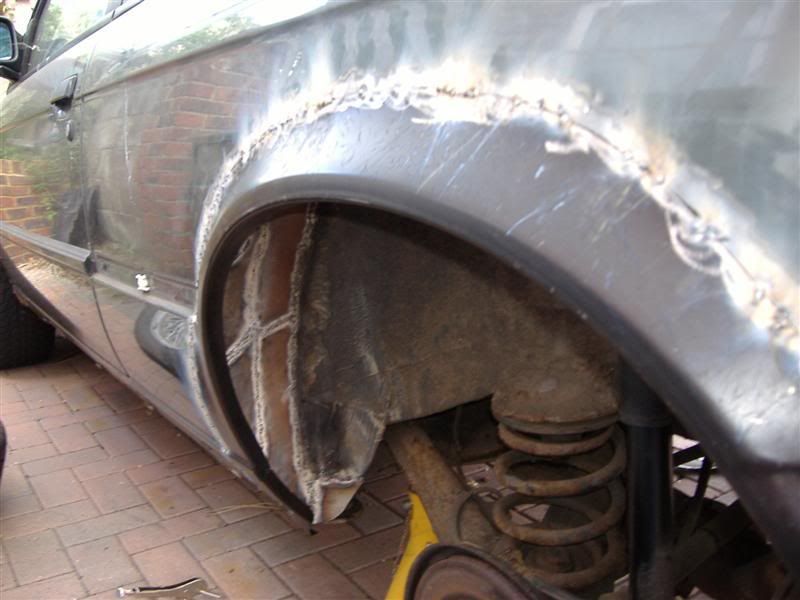
back seats and door cards out reveals the true horror of the arches...
and from inside the boot...
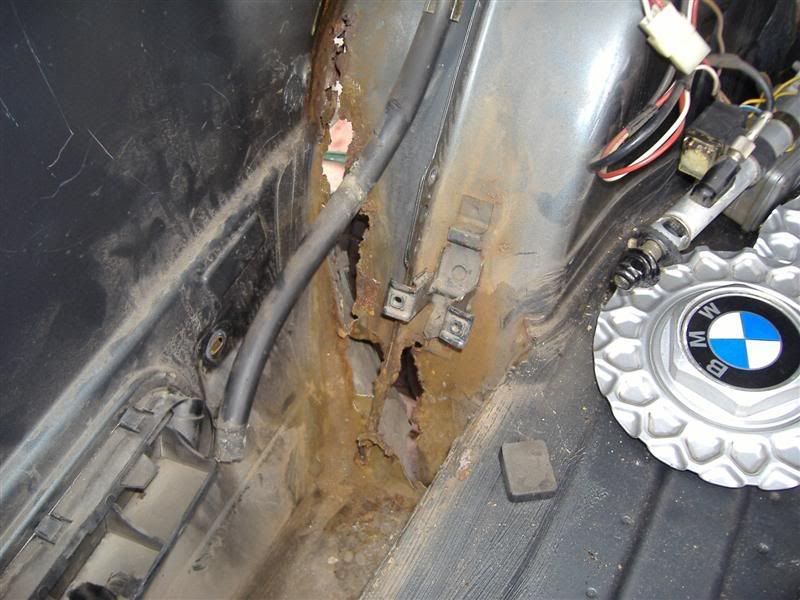
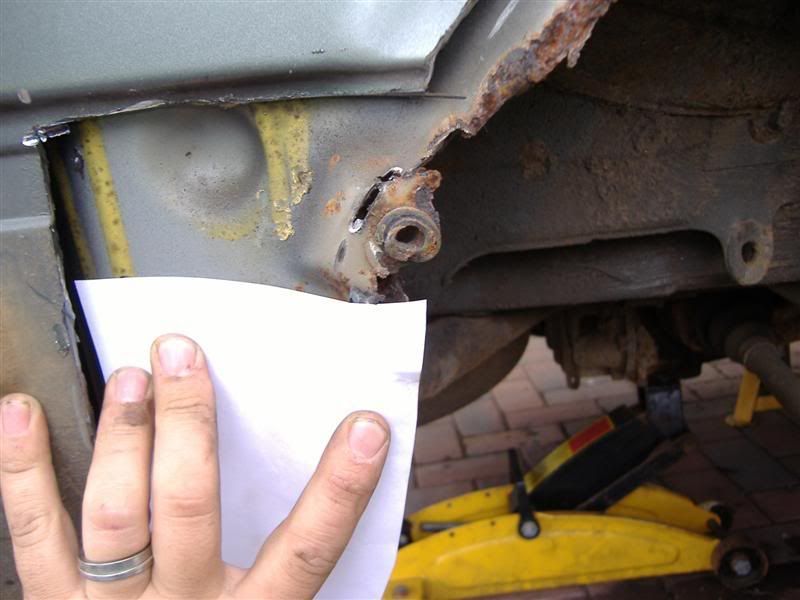
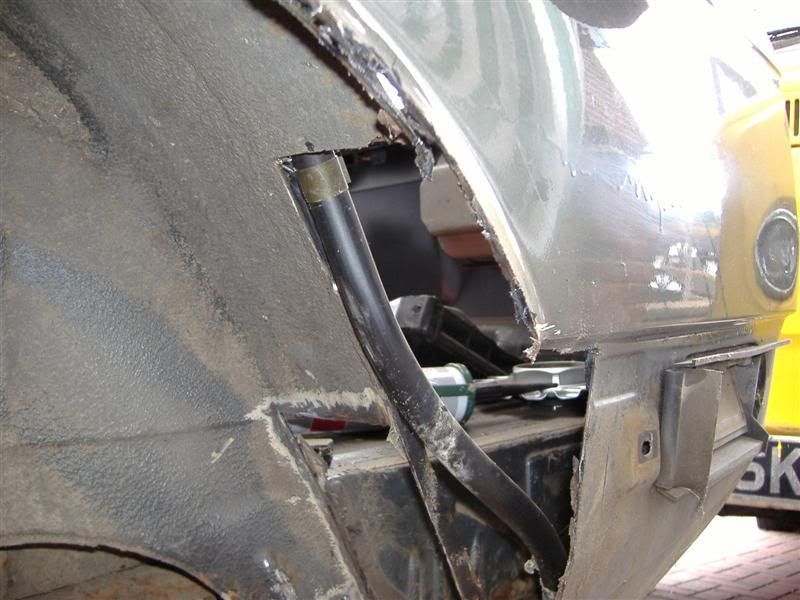
finally, got the rear apron off to reveal more sodding rust...

thats it for today, angle grinder is coming out tomorrow to cut out the rot - will keep you posted.
Pad
Re: Tech 1 Sport resto - work begins at last!
Posted: Tue Aug 21, 2007 11:51 pm
by Dan318-is
Christ! Is that even salvagable?!! Thats up there with one of the worst i've seen for a long long time!
Good luck!
Re: Tech 1 Sport resto - work begins at last!
Posted: Wed Aug 22, 2007 12:07 am
by Jhonno
more than saveable imo most people wouldnt bother tho..
Re: Tech 1 Sport resto - work begins at last!
Posted: Wed Aug 22, 2007 12:14 am
by maggspower
Apart from the rust it looks great

. just started my own project last week with a week off. I've done the strip down and thaught mine was bad, but you've got ya work cut out there fella

If you have the time,skills and resorces go for it, there's too many cars get scraped and broken with so little wrong with them.
I notice you live in Brighton, I bet the sea air had its part to play with the old tin worm.
good luck!!!!
Re: Tech 1 Sport resto - work begins at last!
Posted: Wed Aug 22, 2007 1:23 am
by oakey
Good luck with it all mate. Thats alot of welding needed there! My tech1 is getting "derusted" at the moment also.
Re: Tech 1 Sport resto - work begins at last!
Posted: Wed Aug 22, 2007 6:53 am
by Pad
yeah, its definitely do-able. Would be easier to break but that would be a bloody shame. Car came from coventry so cant blame the sea air for this one!!!

Apparently gusty winds upto 50mph today, that will test the wieghts on me gazebo...
Re: Tech 1 Sport resto - work begins at last!
Posted: Wed Aug 22, 2007 7:07 am
by e30bmlover
you are a very brave man tackleing that car. good on ya!
Re: Tech 1 Sport resto - work begins at last!
Posted: Wed Aug 22, 2007 8:22 am
by josh-hocking
good man! it would have been a shame to have scraped it well done!
Re: Tech 1 Sport resto - work begins at last!
Posted: Wed Aug 22, 2007 8:43 am
by d6dph
Good luck Pad, Got a fair bit of work ahead of you

Posted: Wed Aug 22, 2007 9:33 am
by grantfk10

Another one being saved!
At least it's not ending up here:

Re:
Posted: Wed Aug 22, 2007 10:34 am
by pnd
nice to see it being salvaged i have seen worse brought back from the dead whether it will be cost effective is another question.
Re:
Posted: Wed Aug 22, 2007 10:59 am
by e30den
a pal of mine has recently finished his tech one. and put it back to standard spec. a lot of work but worth it in the end. good luck to ya pad
Posted: Wed Aug 22, 2007 9:37 pm
by Pad
Thanks for all your comments, glad that everyone is supportive of the work, I hope it goes as planned!
Today I started cutting out the rot, concentrating on one area rather than flitting about the place - also means that you mix up the jobs in the day rather than just doing grinding...
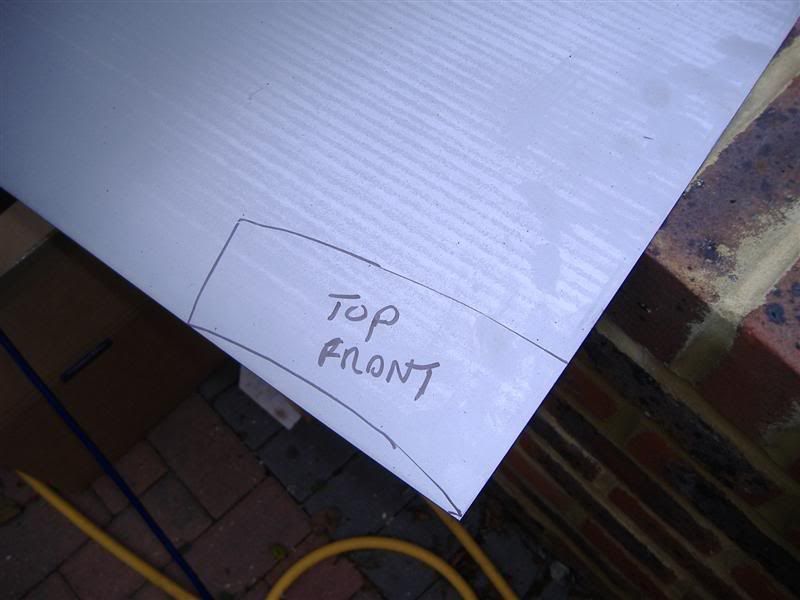
Picked up my repair panels this morning and was pleasantly suprised at the amount of meat on them. However I will not be using all of them, no point in removing more metal than necessary. Unfortunatly I cant get inner arches from my supplier so a fair amount of fabrication is needed...
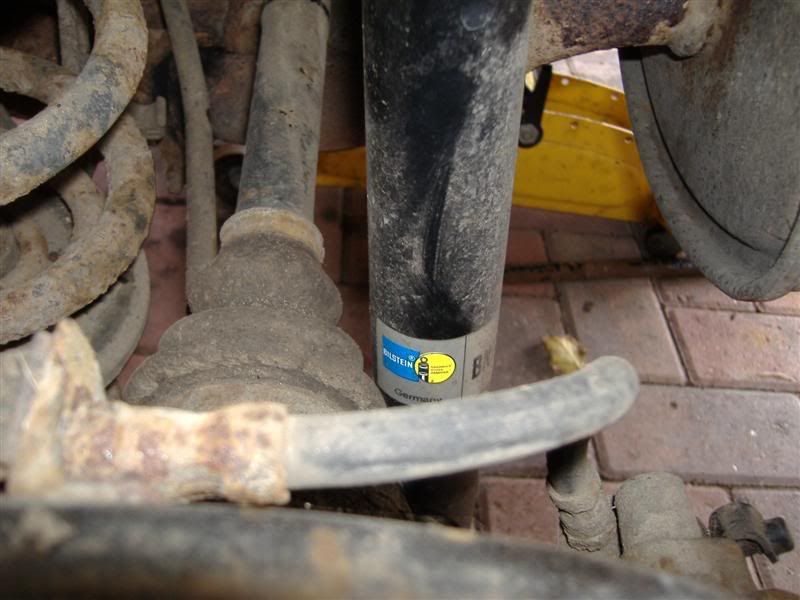
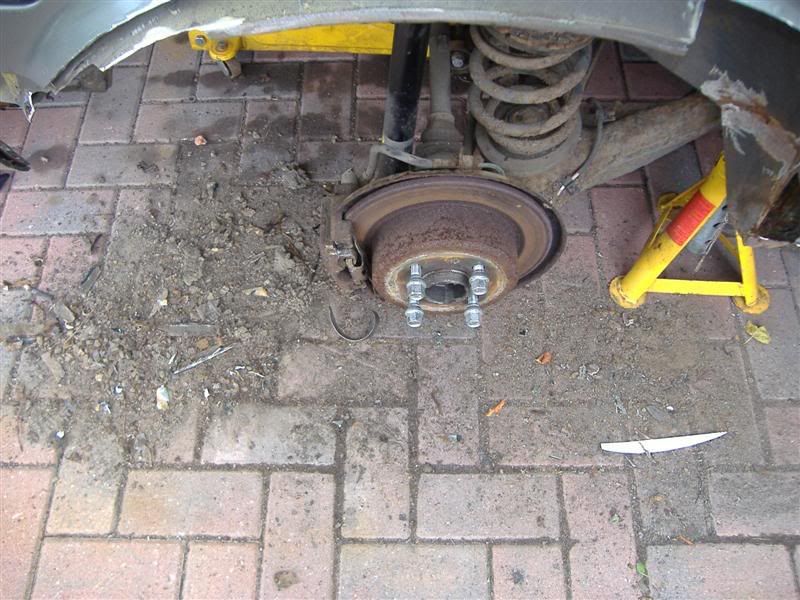
Propped the car up on stands and pleased to see that its fitted with the billies as it should be
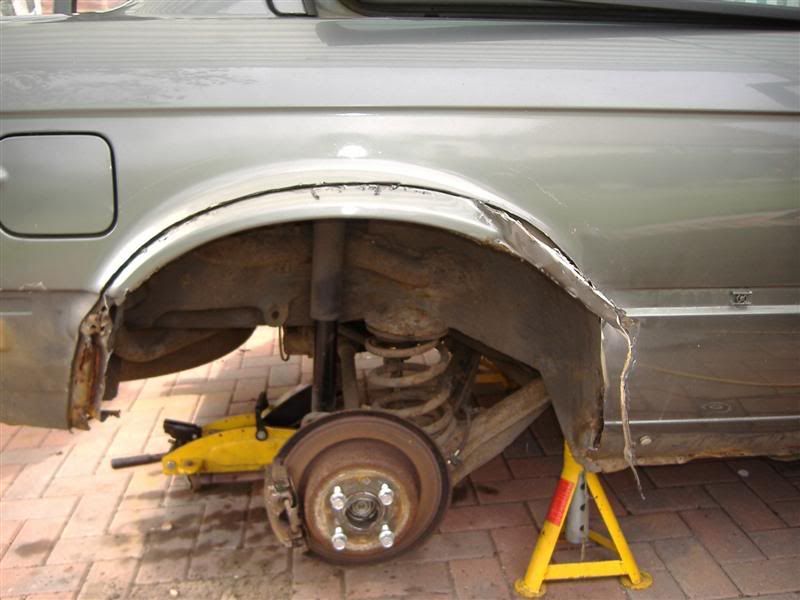
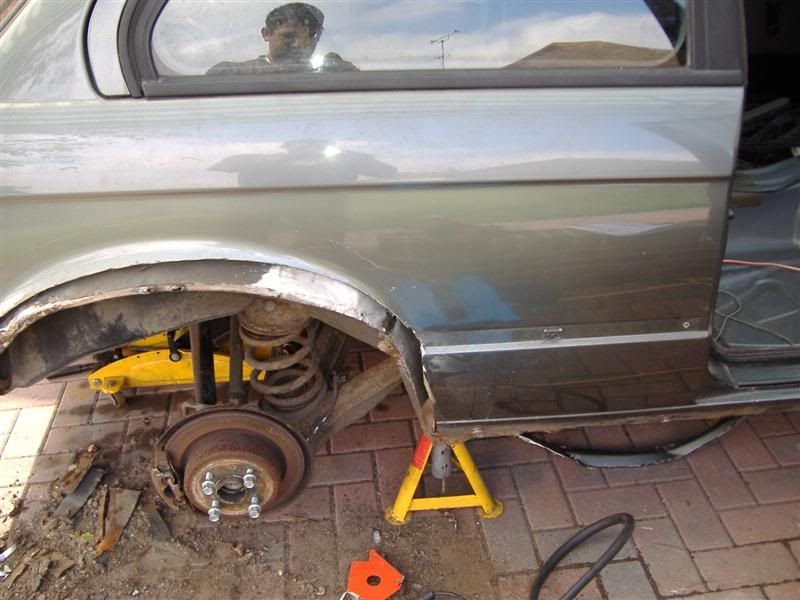
Decided to concentrate on the drivers side rear arch, that being the second hardest bit of work after the passenger side. Before I started..
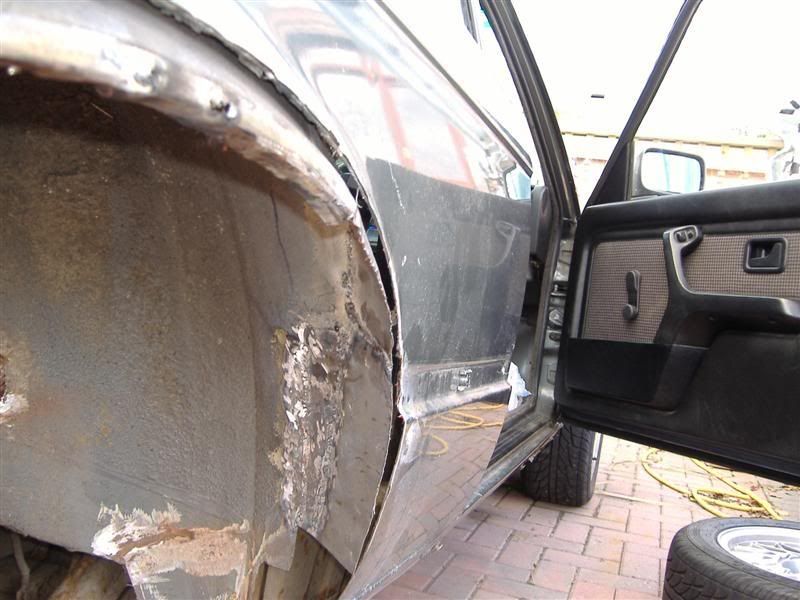
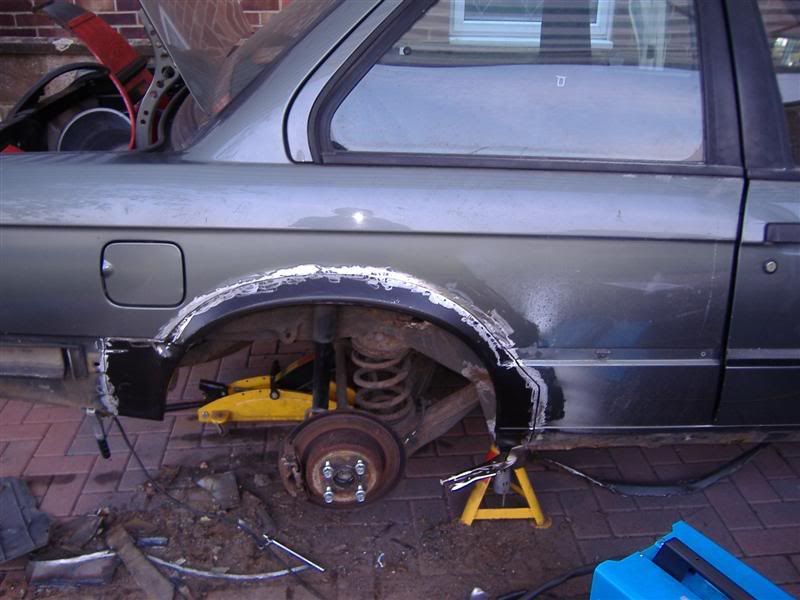
First I wanted to remove as little of the outer as possible so that I could see what was going on behind. Need to be careful here as you dont want to take away precious inner arch and loose your reference. So cut away half way up the flared arch..
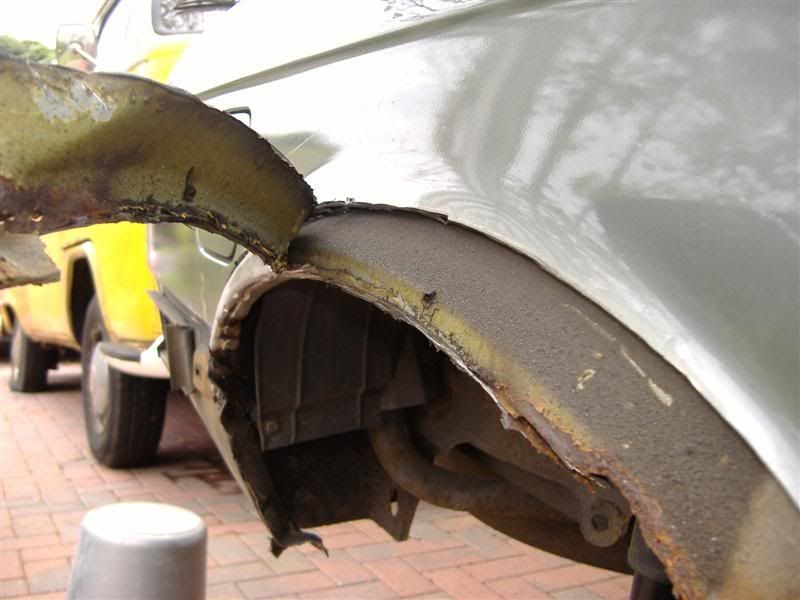
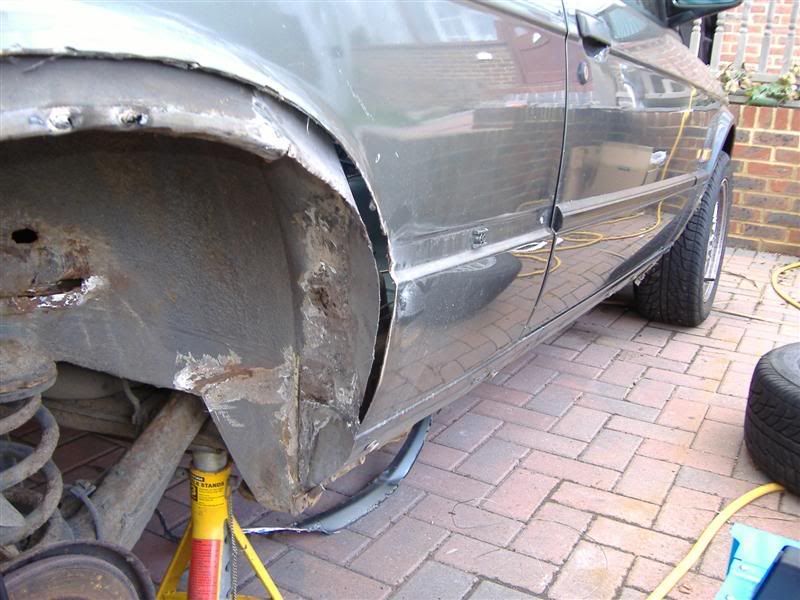
It was soon clear that the inner was a little flimsy towards the back so I removed another section of outer to get a better look, knowing I had plenty of repair panel to replace it.
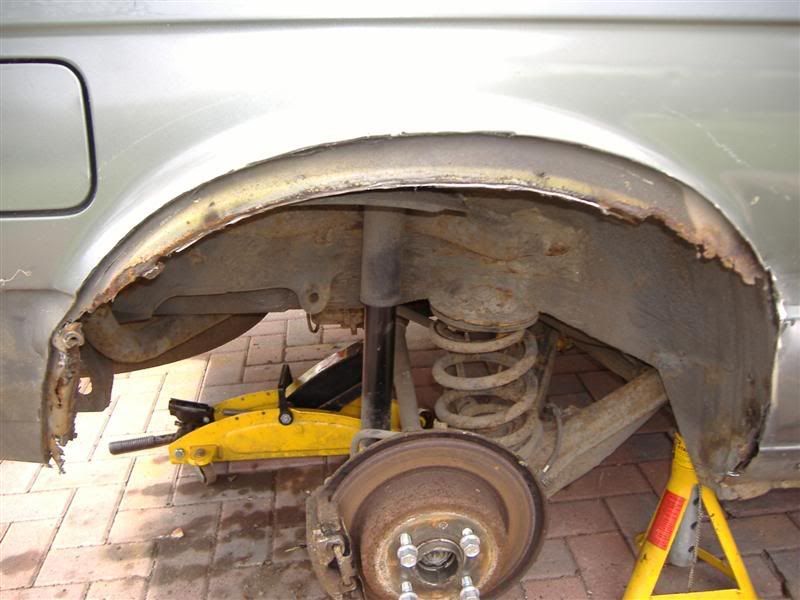
I then could see all of the inner that needed replacing. Before hacking it all out, I made up some templates for the fabricated parts...
I could then get rid of all the nasty stuff, both front and rear, each time cutting sections that I knew I could fabricate and replace, hence some of the funny looking shapes...
So now I have all good, solid metal - needs to be a decent thickness too else the welder will just blow hole in it and that is really frustrating. So dress all the edges back to bare metal...
And now start cutting out shapes from the sheet metal - bloody tin snips have knackered my palms, I am sure by the end of the job I will have proper man hands...
some of the crap that has been falling out...
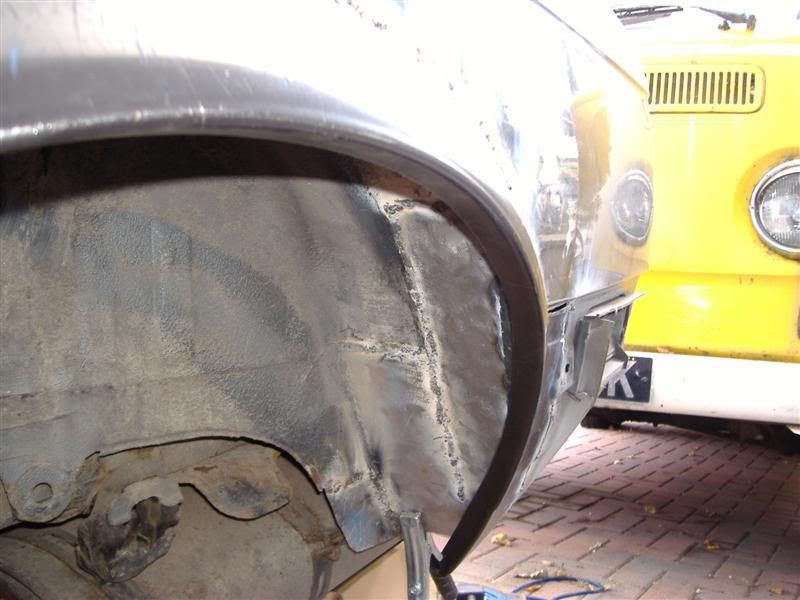
And now onto the fun bit... first off welded the biggest section into place, this then allowed me to draw up templates for the remaining parts.
And then made up another 3 smaller parts in order to make up the required form..
with enough left over to bend up a lip for the outer to be welded to when it finally goes on.

That was it for today, about 6 hours to do all this but got into the swing of things this afternoon so hopefully will be able to complete the fabrication and put on the outer tomorrow...
Cheers for looking!
Re:
Posted: Wed Aug 22, 2007 9:50 pm
by beardymat
oi you, get off my thread title!!!!!
only kidding, but this is starting to resemble my resto post (link in my sig) only with more of the crusty stuff. inner arches are still available for the later facelift cars for around £60 per side. well worth the money imo as it makes a proper job and you dont end up chasing it back. dont know if they are still available for the metal bumper cars but i cant see why not, bmw seem to like keeping their history alive which is no bad thing.
keep up the good work and the piccies too

Re:
Posted: Wed Aug 22, 2007 9:53 pm
by maxfield
You're braver than most...
Good luck with it...
Will subscribe to this thread...
Re:
Posted: Wed Aug 22, 2007 9:54 pm
by Jhonno
Looking good

Re:
Posted: Wed Aug 22, 2007 10:42 pm
by Pad
beardymat wrote:oi you, get off my thread title!!!!!
only kidding, but this is starting to resemble my resto post (link in my sig) only with more of the crusty stuff. inner arches are still available for the later facelift cars for around £60 per side. well worth the money imo as it makes a proper job and you dont end up chasing it back. dont know if they are still available for the metal bumper cars but i cant see why not, bmw seem to like keeping their history alive which is no bad thing.
keep up the good work and the piccies too
ooer, must have subconciously nicked your title - sorry dude! Fantastic work, I need to set aside some time to read filly. I fear mine will lack the welding neatness...
but as long as it penetrates and I can grind back I can live with it - just takes more time.
dont really want to drop complete new arches in, worried about alignmient of suspension etc so will carry on as is now...
cheers for the encouragement
Re:
Posted: Thu Aug 23, 2007 3:56 pm
by pacerpete
F4ck me , you don't need a tent, you need a kennel !
Alas, metal bumper inner arches are nearly £150 each and different to plastic bumper arches, grrr !
Re:
Posted: Thu Aug 23, 2007 10:49 pm
by Pad
pacerpete wrote:F4ck me , you don't need a tent, you need a kennel !
Alas, metal bumper inner arches are nearly £150 each and different to plastic bumper arches, grrr !
youre not wrong.....
re: inner arches - I am confident I can rebuild them and dont see the point in taking out more metal than is absolutely necessary...
no work today, was feckin about getting some clamps and a magnetic work holder - hopefully this will help in improving the welding.
Re:
Posted: Thu Aug 23, 2007 11:03 pm
by beardymat
Re:
Posted: Thu Aug 23, 2007 11:28 pm
by Nefarious7907
That looks like a ton of surgery, best of luck to you.
Re:
Posted: Fri Aug 24, 2007 9:18 am
by cuk325
fair play to you mate, i wished idve done that to my old tech 1 ratherr than break it. alhtough i did make a handsome profit!!

Re:
Posted: Fri Aug 24, 2007 10:17 pm
by Pad
lol, its like that is it? No posts without pics - ok here we go...
Yesterday I spent a bit of time looking at beardymatts resto thread which was supposed to inspire me but had the opposite effect and put me on a bit of a downer. I realised that I do not possess the talent to restore the car to anywhere near that standard and I had to lower my expectactions a bit. I am now aiming to have a solid, usable Sport rather that 'one of the best Tech 1s', hopefully it will still look the nuts...
Anyway, enough self pity.

I decideded that I needed some more tools yesterday and by the time I finished pissing about in Crawley it didnt seem worth starting so I left it for today. Started at nine and decided I was really going to try harder with the welding and set about the front section. Bit better this time...
just got this done and was feeling pretty pleased with myself when I ran out of fucking wire. Not HP - had to gun it upto Crawley again (and I did gun it

) and got back about midday to crack on with some more plates...
Once I had spend an amount of time putting up the outer and seeing where it would mate I set about cutting the panel up - there was no way I was using all of it, not necessary.
with this section cut out I then used this as the template to mark out on the car... at this point I realised I was really unhappy with my first bit of welding from Wednesday so I cut it out and started again - much happier now with the integrity of the whole repair now - its absolutely solid.
Spent about hour and a half fettling the body work to make the repair panel fit and was just about to tack it on - had it all lined up.....
When it fell off - thought I had clamped it up well but then realised I had clamped it to a section that wasnt solid (doh) and it crumbled. So, one more plate (why not eh?)...
and that was it for the day. 6 hours work there, believe it or not.

I honestly felt like setting fire to it a couple of times today but ended the day on a high, hoping to get the outer on tomorrow and secure it to the inner. May even get started on the other side...

And by the way Matt, the intention is fully to sell it when its done - thats my hobby, buying, sorting out and selling on - granted I have never done as much as on this one!!
Cheers,
Pad
Re:
Posted: Fri Aug 24, 2007 10:34 pm
by beardymat
sorry for the uninsperational thread pad, lol
what you have to bear in mind is that i have spent half my life repairing cars now which mounts up to a lot of experience. what you are doing is worship worthy to the highest degree and certainly better than some of the work ive seen monkeys do in so called professional bodyshops. when you factor in that you do it as a hobby it makes it more apparant that you are a hero through and through. a lot of people would just reach for the yellow pages and look up scrap collection but you say bring on the mig

keep it up fella and as ive said before
Re:
Posted: Fri Aug 24, 2007 10:35 pm
by Eddie25
Hero! To do all this on your driveaway. Hats off to you fella.
Re:
Posted: Fri Aug 24, 2007 10:37 pm
by Pad
cheers dude - your comments are much appreciated.
Re:
Posted: Sat Aug 25, 2007 9:40 pm
by ed325i
It will be worth it in the end.
I have just got my 323 ready for paint after alot of work, it is hard work doing it on the drive.
Re:
Posted: Sat Aug 25, 2007 10:37 pm
by Pad
bit more done today but not as much as would have liked as I got called off to do dad duties down the beach - took all of 5 seconds to get there, welding aint much fun in this heat.
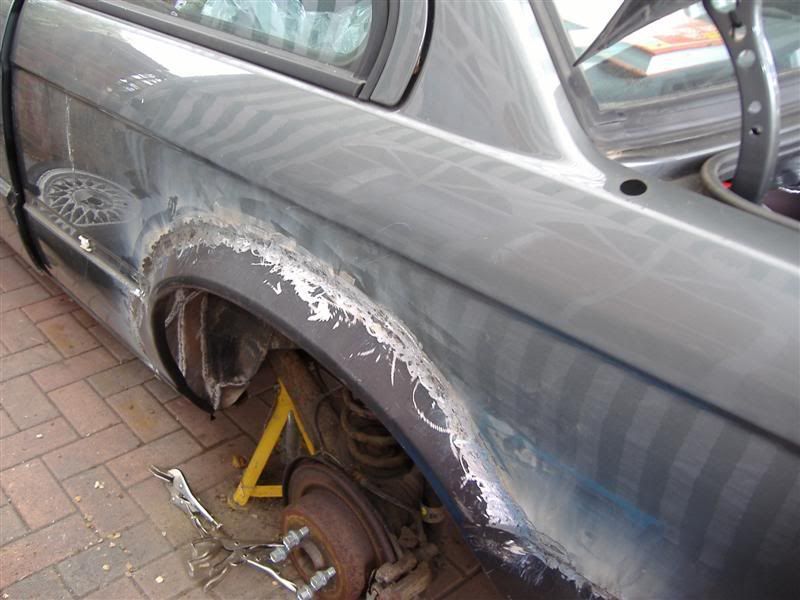
Anyway, the time I did get was useful, I now have a solid rear arch, outer and inner
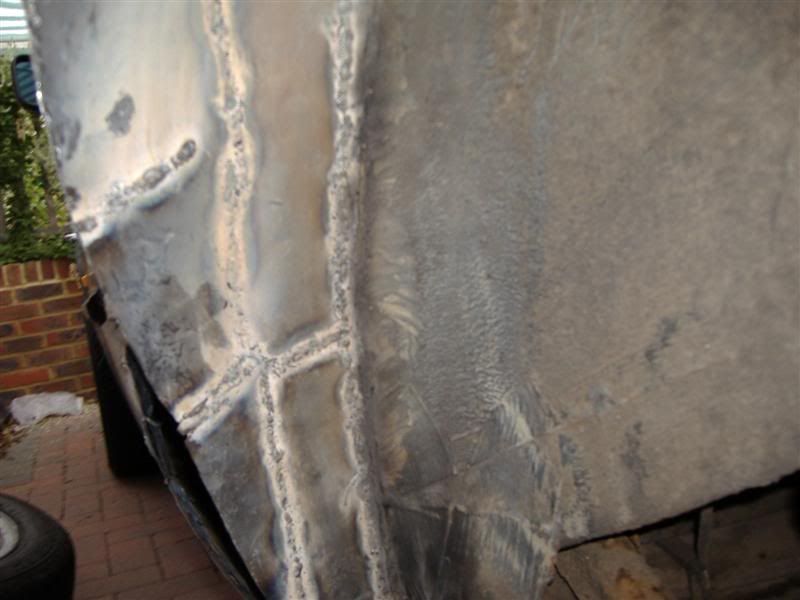
first tacked on the outer, spacing about 15mm and clamping up the joints together ahead of welding to get the best butt joint I could - this seemed to work quite well.
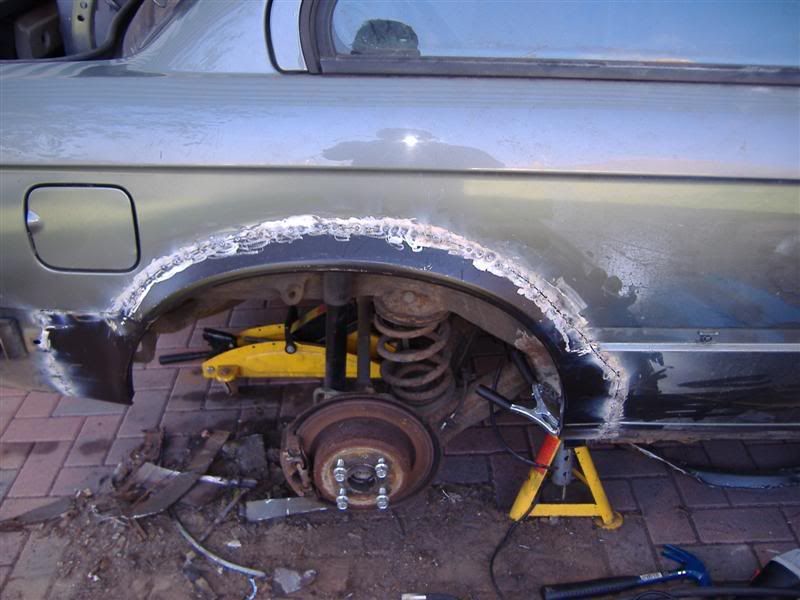
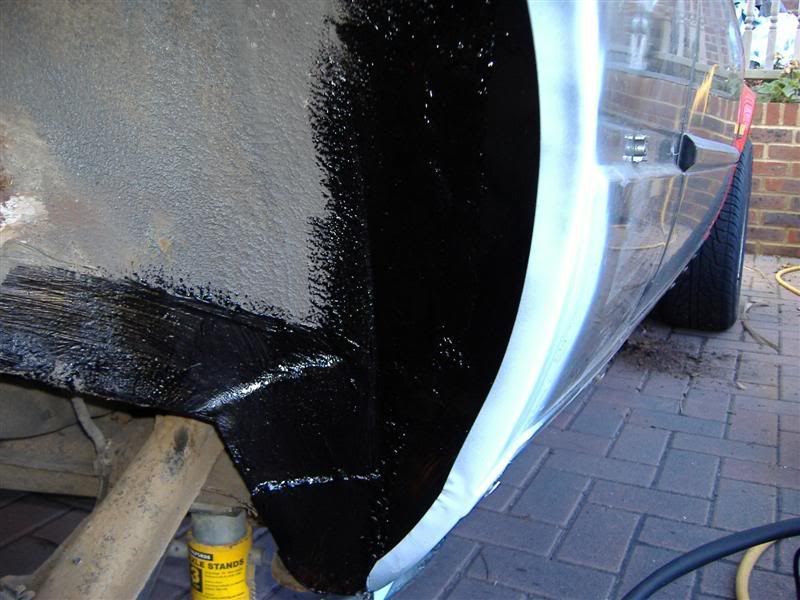
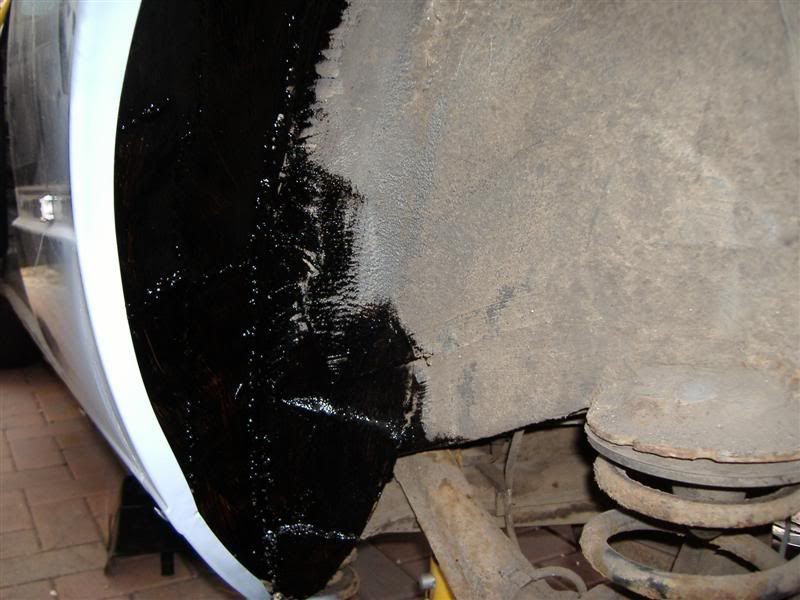
Then filled in the gaps, ground back - had to do this a couple of times in places until I got a finish I was happy with..
Then hit it with a coat of etch and also put some waxoyl on the inner. Will tack the inner to the outer tomorrow but that will probably be it for this week, have friends round for the rest of the weekend. Cant tell you how happy i was after taking these pics - a solid arch...
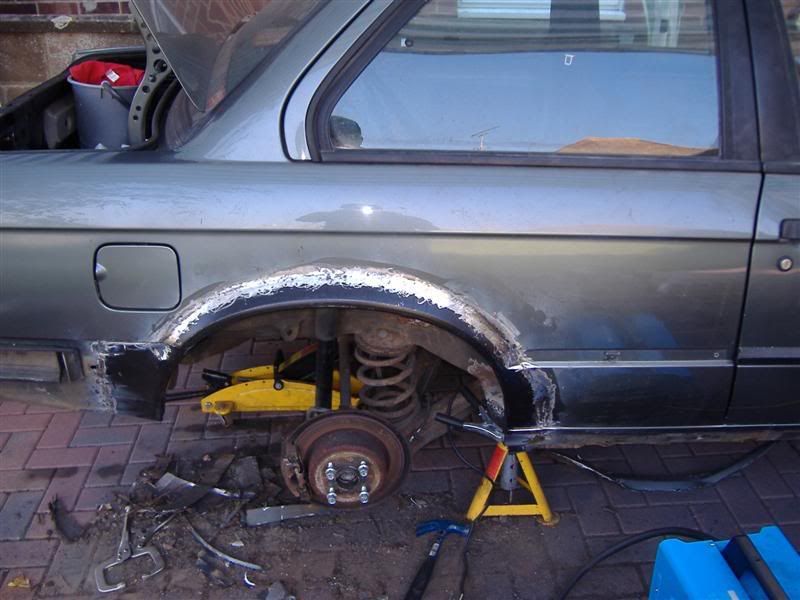
needs a fair bit of cosmetic work but my priority is to get the car roadworthy first - will get it all prepped for paint in one hit.
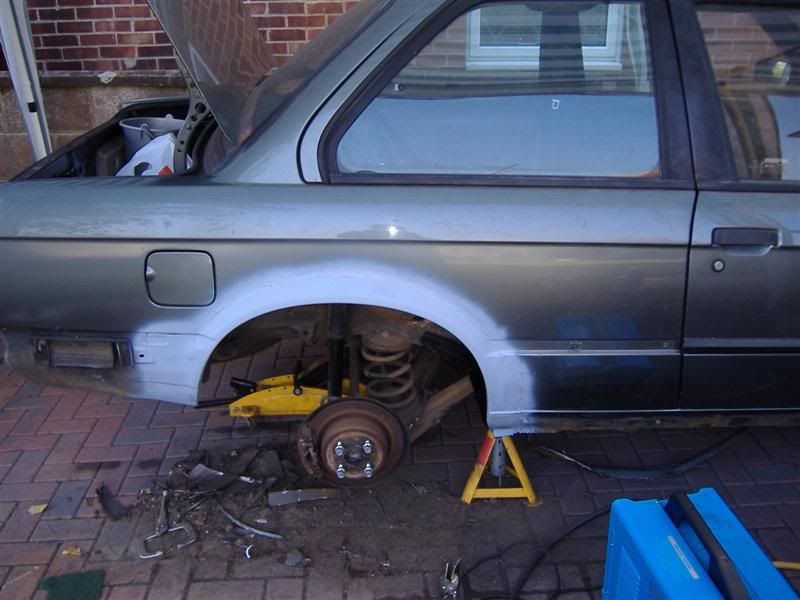
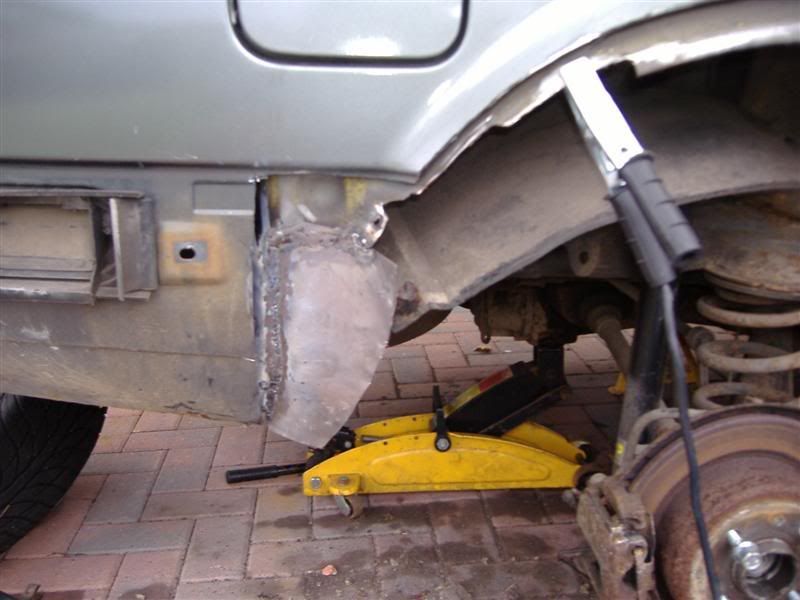
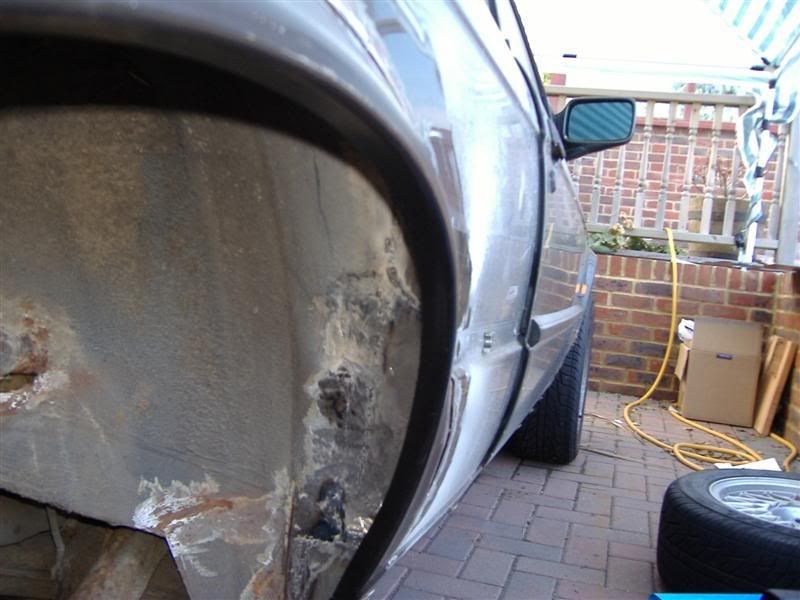
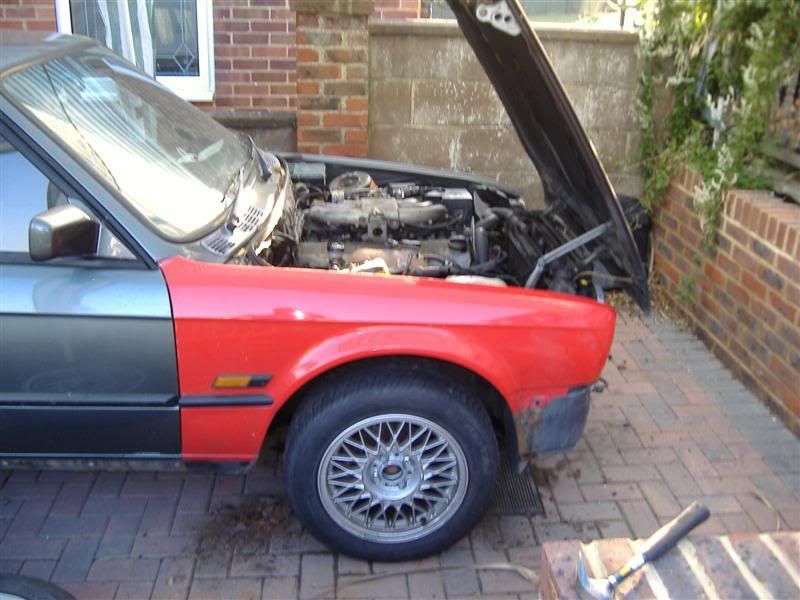
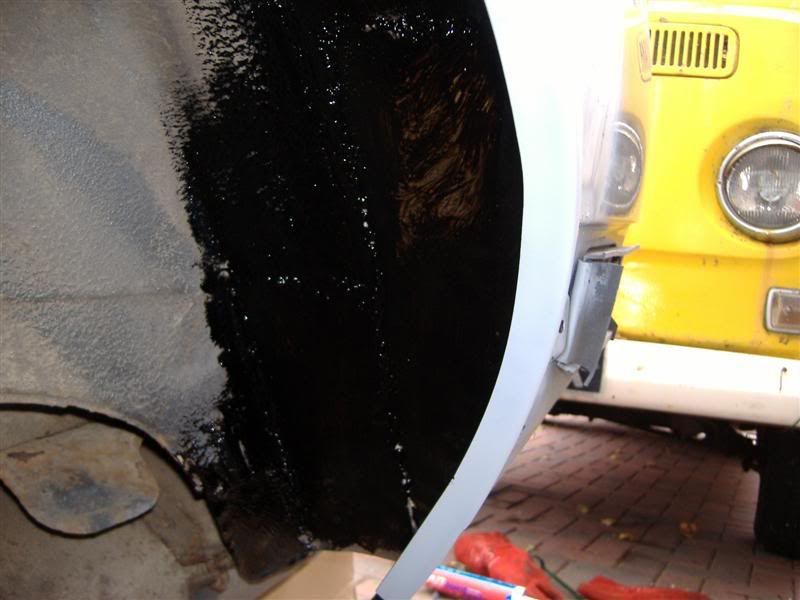
oh, and hung on my 'new' wing for good measure - wont be on for long though, found a bit of work needing doing on the inner front..
Cheers
Pad
Posted: Sat Aug 25, 2007 10:53 pm
by johnl320
Great pics and great read, keep it up, you're a proper hero
john
Re:
Posted: Sun Aug 26, 2007 7:56 am
by H35-IAN
good on you mate keep up the good work there ive not been about on the zone for a while but ive had a few tech 1s myself i to am guilty of breaking one however it was a write off lol but id never break another!! looks like you got your work cut out literally! but enjoy it and when you kick it sideways for the first time on the spot you will know it was all worth while in my eyes the tech 1 was the best all round off the track e30 ever made ive had 3 of em enjoy it and keep on strumming!!!
Re:
Posted: Mon Aug 27, 2007 1:13 am
by calipsodream
looks a tidy job your doing m8
Re:
Posted: Mon Aug 27, 2007 1:50 pm
by snoops
Re:
Posted: Mon Aug 27, 2007 9:31 pm
by josh-hocking
well done looks amazing looking forward to see it finished!!!
Posted: Sun Sep 02, 2007 11:00 pm
by Pad
ok, managed to get some more work in yesterday and today. Basically got the other arch done in twice the time and this side was worse. Had much more confidence and didnt muck around with too much chin scratching...
Bad metal cut out - went much bigger cuts this time, rot was worse this side...
and then started the quiltwork. Had to do a number of sections to achieve the form I wanted. The rear part of the arch was just simple flat plates.
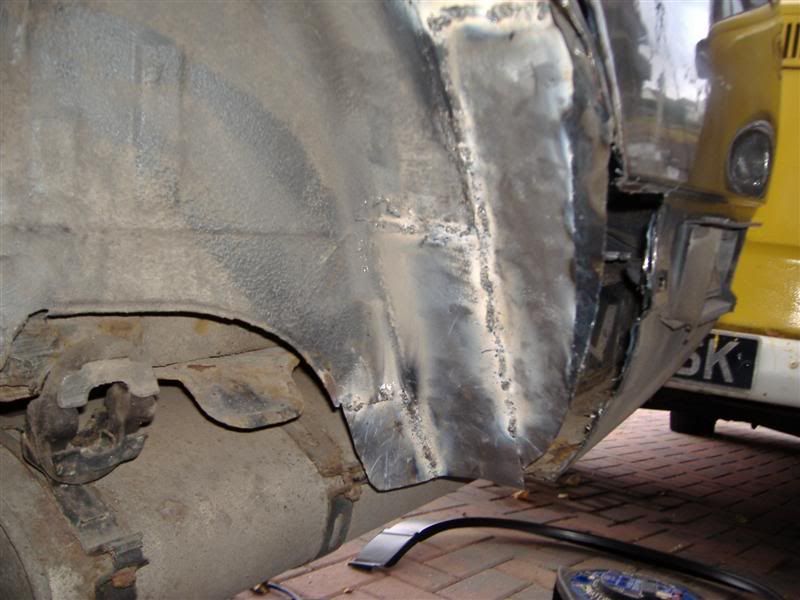
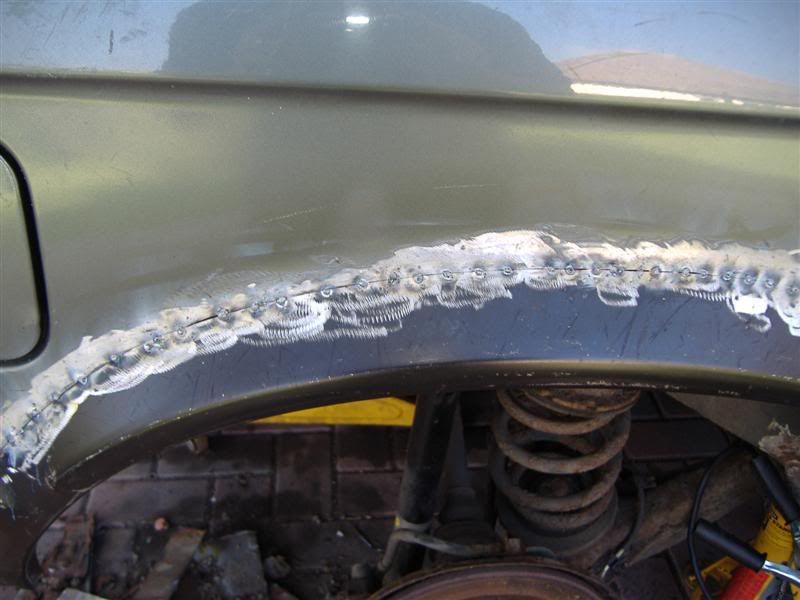
Then after a lot of mucking about and fettling, managed to tack on the outer, with the inner touching the return lip. I actually like the look of the patterns on the inner!!
Then ground down and waxoyl/etch applied - the afters here although as before, an awful lot of work to be done prior to paint still
So thats the most difficult parts out of the way. Next week I have a number of other areas to attend to in the rear valance and a bit on the front floor but am not expecting to be anywhere near as difficult as the arches. Watch this space...
Pad
Re:
Posted: Mon Sep 03, 2007 12:32 am
by whipsey
looking good keep the pics coming