Page 1 of 5
325i Touring resto thread - damp footwells
Posted: Sat Aug 13, 2011 12:26 pm
by Grrrmachine
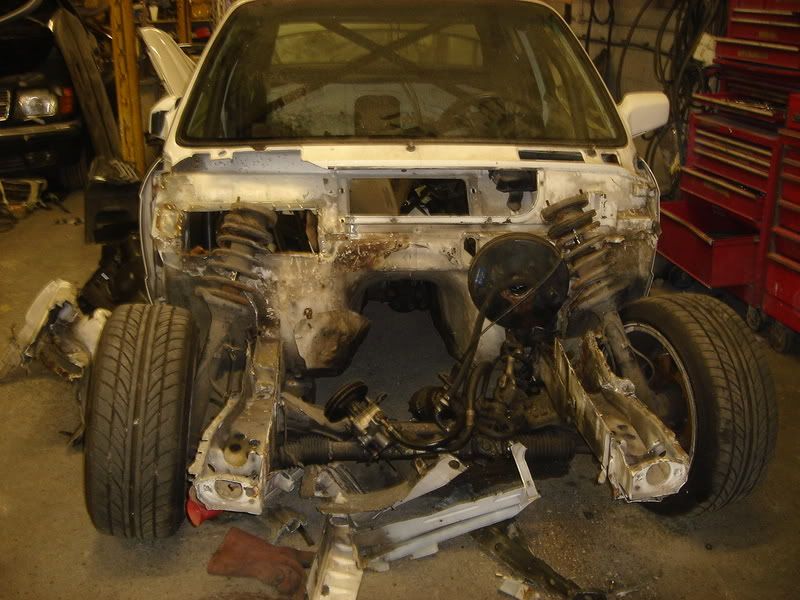
The car needs a respray, so I'm rust hunting. Took off the driver's wing (LHD) expecting it to be bad, and wasn't quite prepared for this level of damage...

I've got a good section chopped out of a donor vehicle, although it's not quite long enough; it doesn't run all the way up to the bulkhead.
My question is, should I try to separate the inner wing by drilling out the spot welds, plus making up patches for the rest, or should I chop and weld in straight lines?
Spot welding seems more professional, but there's a lot of other work to do anyway so I don't want to make more for myself if it's not necessary.
Re: Inner Wing Repair
Posted: Sat Aug 13, 2011 12:51 pm
by daimlerman
Oh dear.
And that's with the dashboard still in the car,wiring loom still in....
Pound to a pinch of shite that the wiring duct area has the 'metal delete' option as well...
A better base shell would be my choice,sorry to sound cruel,but that is a shed-load of welding to structurial areas that need to be absolutely right.
Re: Inner Wing Repair
Posted: Sat Aug 13, 2011 1:23 pm
by Grrrmachine
Yeah, I do understand that, but it's one of those in-for-a-penny, in-for-a-pound things. Any other shell I look for is likely to have similar horrors lurking underneath. That's the price we pay for having -30 degree winters.
And the rust does extend along the bulkead to underneath the fuse box too; I intend to cut out the rotten edge and lap weld over it. I don't know what the "metal delete" option is though...
Re: Inner Wing Repair
Posted: Sat Aug 13, 2011 11:37 pm
by Dezzy
"metal delete" option is ticked all to often these days

Re: Inner Wing Repair
Posted: Sat Aug 13, 2011 11:45 pm
by Simon13
no way, thats had action of some sort, OR the car has been run without the plastic arch liner for a looooooooooong time. the flitch is proper MIA!! I'd put money in 90% of those e30s in europe just having the usual jacking point dramas and the odd bit higher up.
That could be fixed. Best course i think would be to get a complete flitch and let it in and repair plate the other areas. Body types will know more than me. Iirc the flitch can removed without too much drama. I'd be sitting down and having a long chat with myself before acting
Re: Inner Wing Repair
Posted: Sun Aug 14, 2011 12:01 am
by Ranchero
What's the "flitch" Simon?
Re: Inner Wing Repair
Posted: Sun Aug 14, 2011 12:04 am
by Dezzy
Simon13 wrote:no way, thats had action of some sort, OR the car has been run without the plastic arch liner for a looooooooooong time. the flitch is proper MIA!! I'd put money in 90% of those e30s in europe just having the usual jacking point dramas and the odd bit higher up.
That could be fixed. Best course i think would be to get a complete flitch and let it in and repair plate the other areas. Body types will know more than me. Iirc the flitch can removed without too much drama. I'd be sitting down and having a long chat with myself before acting
No you wouldn't.
You would take it on, do sh1t loads to it, almost skint yourself. Then you'd find some zero milage 'M' motors. Sell them cheap. then finish it off

Re: Inner Wing Repair
Posted: Sun Aug 14, 2011 7:42 am
by Grrrmachine
I'm presuming that the "flitch" is the strengthening part of the inner wing (41111923978 on RealOEM).
I have one from a donor, but it'll need extending towards the bulkhead about two inches. Based on rust around the area, I'm going to cut inside the engine bay, between the inner wing and the turret, and let in a whole new metal section from the end of the "flitch" to the bulkhead.
The rest is standard repairs. I spent last night reading all the other horror stories/ resto threads on here, so that I can see what I'm in for, and the only bit I'm scratching my head around is where the inner wing meets the bulkhead, under the fuse box. I can't quite work out how the skins were folded originally so that they meet up there.
Re: Inner Wing Repair
Posted: Sun Aug 14, 2011 8:43 am
by powelly
Inner flitch is another term for inner wing. If you plan on taking that right back to the bulkhead you'll need some measuring equipment. You will very possibly find that you won't be able to replace spot welds like for like, in this case you would use MIG plug welds.
Re: Inner Wing Repair
Posted: Sun Aug 14, 2011 10:03 am
by Grrrmachine
I've done some more tentative cutting, and the rot hasn't QUITE got to the wiring loom hole. However, it spreads inside from that seam, so that the triangle box section (under the scuttle, above the glovebox hinge if I had one) is also rotten.

I guess I'm going to have to cut out the fuse box mount, and the flat bit behind it, just to see what's down there...
Re: Inner Wing Repair
Posted: Sun Aug 14, 2011 12:14 pm
by nickso
Difficult area to repair properly there are so many joints/bends around the heater box and the bulkhead. I would suggest you are wasting your time if it's into the heater box itself as the seam from the box to the bulkhead is almost impossible to seal properly as you can't really get into it to be sure you have sealed it properly and are not just leaving a hole for the water in the box to sit in.
Ironically it would actually be better for you if the rot was only lower down around the loom hole as that's quite simple to repair.
Re: Inner Wing Repair
Posted: Sun Aug 14, 2011 3:58 pm
by Grrrmachine
Right, I've spent the afternoon cutting back to assess the damage. Angle grinders with slit discs, and the dremel, have been a godsend:

As you can see, the worst of it was under the fuse box, but I think I can patch the layers in fairly easily, considering most of the inner wing is already missing.
But my new worry is the seam between the inner wing and the bulkhead, as it runs down under the brake servo:

It's only spot-welded, but it's got rust all the way down to the chassis leg. Mostly surface rust, but one or two pinholes too. Not sure how to attack that.
Re: Inner Wing Repair
Posted: Sun Aug 14, 2011 8:23 pm
by Simon13
/\ alot go here, its rust starting from the welds when it was new. Judt like in the inner rear arch where all the brackets are spot welded onto the arch for the fuel filler neck and breather system.
This is where cars fitted with bilsteins from new and cars tracked alot can develope stress cracks.
My alpina 2 door suffered this on that side along with some rust thrown in.
Re: Inner Wing Repair
Posted: Sun Aug 14, 2011 8:30 pm
by Kos
you need to cut as below
get it on a jig
and fit new panels and have it perfect as below
Re: Inner Wing Repair
Posted: Sun Aug 14, 2011 9:12 pm
by Grrrmachine
Hahah, thanks for that Kos, although that's a little bit out of my league for the moment.
I'd love to splash out on new panels to make this job a lot easier, but for the moment all I've got is a bit sheet of 1mm metal and Practical Classics' "How To Fabricate Floor Pan Repairs". That'll have to do for now.
Re: Inner Wing Repair
Posted: Sun Aug 14, 2011 9:17 pm
by Kos
doing the one inner wing isnt such a bad job. ok they are no cheap but you will not need to have it on a jig
but anyhow, at least you can see that repairs are possible lol
Re: Inner Wing Repair
Posted: Sun Aug 14, 2011 9:24 pm
by Grrrmachine
yeah, the resto threads on here were a massive confidence boost, and the brilliant advice of "little bits at a time" have worked great.
The seam isn't actually that bad. Considering a lot of the inner wing is coming off, I made a cut about half an inch from the seam, half way down, and seperated the wing from the bulkhead. Then I cut out the little bits of rust that were bad, and cleaned up the rest with a wire brush on the Dremel.
Once the bulkhead is all patched up, I'll join the inner wing back to it along this original seam before cutting anything further. Pics tomorrow.
Re: Inner Wing Repair
Posted: Sun Aug 14, 2011 10:33 pm
by Grrrmachine
I'm making a write-up on another forum, and someone there has recommended reading this site for tips:
http://retrorides.proboards.com/index.c ... st=1066154
I've highlighted the post where the Fabrication Guru repairs almost exactly my problem, except on an older BMW, probably an E12.
Re: Inner Wing Repair
Posted: Mon Aug 15, 2011 12:27 am
by HairyScreech
on the first photo are there seam welds running down the edge of the panel? are they all like that? (just cant remember)
otherwise whats the chance that has been replaced before?
Re: Inner Wing Repair
Posted: Mon Aug 15, 2011 9:54 am
by nickso
HairyScreech wrote:on the first photo are there seam welds running down the edge of the panel? are they all like that? (just cant remember)
otherwise whats the chance that has been replaced before?
They all have those welds.
Re: Inner Wing Repair
Posted: Mon Aug 15, 2011 11:11 am
by Jozi
Grrrmachine wrote:I'm making a write-up on another forum, and someone there has recommended reading this site for tips:
http://retrorides.proboards.com/index.c ... st=1066154
I've highlighted the post where the Fabrication Guru repairs almost exactly my problem, except on an older BMW, probably an E12.
That is a really good thread, I got a lot out of it confidence wise for undertaking some of the repairs I had to do on my touring. This is another good thread I came accros:
http://vwrides.com/viewtopic.php?t=43&p ... sc&start=0
Good luck with the repairs!
Re: Inner Wing Repair
Posted: Mon Aug 15, 2011 12:59 pm
by HairyScreech
nickso wrote:HairyScreech wrote:on the first photo are there seam welds running down the edge of the panel? are they all like that? (just cant remember)
otherwise whats the chance that has been replaced before?
They all have those welds.
hmm, just something i have never noticed then.
Posted: Mon Aug 15, 2011 6:06 pm
by Grrrmachine
well, the first repair patch went in today:

I haven't taken a picture of the welding because it's awful (since I'm a novice) but the penetration looks alright from the footwell on the other side, so I'm happy.
This rust was caused by the sealant BMW pumped into the A-pillar. It spilled out and settled in the seam under the scuttle, acting as a moisture trap. I'm sure quite a few E30s have this under the fuse box, hidden by the scuttle.
The biggest fear for me was loom damage, followed by fire. Because the dash is still in, the sound insulation was at risk so I inserted some sheet steel offcuts behind the welding, and welded from the engine bay. Melting underseal stinks, but apart from that there were no issues.
Getting the bulkhead/footwell solid is the current priority, then I can rejoin the inner wing to good metal.
Posted: Sat Aug 20, 2011 10:05 pm
by Grrrmachine
I tackled some of the bulkhead today:

This part sits just behind the plastic arch liner, and had one of the mounting holes which had long since rotted away.
So, cut the infected area out:

Make up two patch panels (one to repair the bulkhead, one to extend the arch outwards) and line them up for fitting:

And then start laying down snotty little blobs of weld to hold it all together:

I didn't quite get the chance to weld in the second of the two panels, but it's beaten into shape and the holes have been drilled to plug-weld the two edges together, similar to the original seam that had rotted away. I used a massive strip of copper (50x5mm) behind the panel to take heat away as I welded, and also to help me fill the gaps from my less-than-perfect patch forming.
Re:
Posted: Sat Aug 20, 2011 10:13 pm
by Dezzy
Well done for having a go mate.
A start is a start imo.
If you dont have a go you'll never get any better.

Re:
Posted: Sat Aug 20, 2011 10:19 pm
by Grrrmachine
Exactly. This one was bought from the very beginning for me to learn all about fixing and restoring cars, and it's worked out better than any local college course. The repairs aren't tidy, but they're solid (I've been shining a light from the footwell to check for pinholes), and the welding penetration is all good. I'll grind down where needed, then go through all the chemical stages of seam sealer and etch primer, before paint and underbody spray.
But some choice words were definitely uttered today, trying to curve that arch repair panel in properly.
Re:
Posted: Sun Aug 21, 2011 12:19 am
by BackPeddler
by the look of things you just need to turn the power up on the welder, leave the wire speed as it is. I only have a cheap clarke hobby mig 145 that i purchased from machine mart for about £140 about 12 years ago, but i have used it in my bodyshop almost every week. Here is some of the welding i did on my off roader, good welding is possible with a cheap welder. I wasnt trying to make the welding look good, just to get it done quickly, this thing spends most of its time full of mud and water.

Re:
Posted: Sun Aug 21, 2011 7:49 am
by Grrrmachine
The snots come from having to patch through the holes that I was burning through, so I'm not sure turning up the power will help.
The welder's a Snap-On, 130A, with four power settings. It's on the lowest at the moment, and I get all the right sizzle and penetration; it just doesn't look very neat because my technique is rubbish

Re:
Posted: Sat Aug 27, 2011 7:47 pm
by Grrrmachine
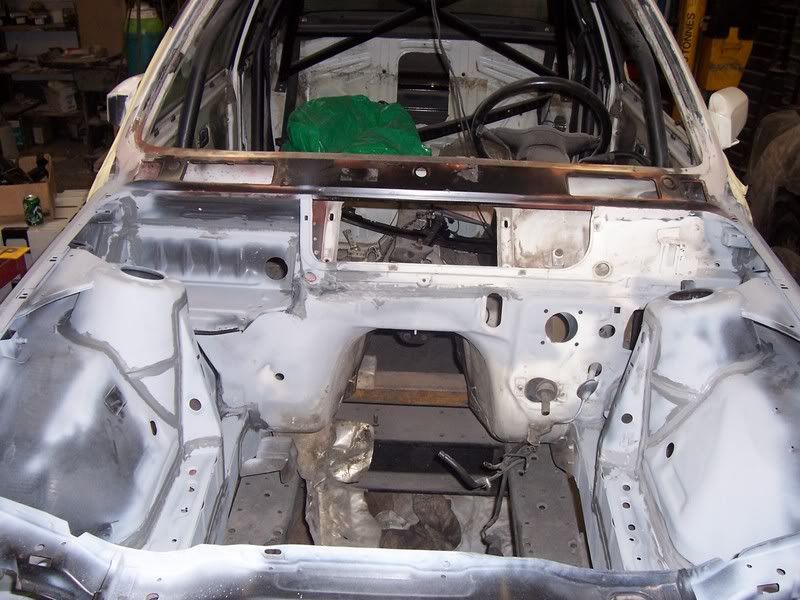
Right, that's all the repairs under the fuse box taken care of. For those that come across rust in this place, here's the deal:
Cut it all out through both skins (scuttle and bulkhead). You will have to slice off the bracket for the fuse box too.

Weld in the repair panel for the bulkhead (I did do it properly, this is just a few clumsy tacks)

Weld in the repair panel for the scuttle, with plug welds in place of spot welds at the bottom

Understand how the two plates make a triangle drain, so that water that enters the wiper grill holes can run out through the inner wing. Note the bulkhead repair has been sprayed with zinc-rich primer.
If you remove the windscreen wiper grill, you can access the area behind the scuttle. This will be necessary, because the waxy anti-rust BMW use, and their seam sealant, are flammable, so scraping as much away as possible reduces smoke and flames in the area.
This repair was done with the dash and wiring loom still in place, although I did insert off-cuts of steel between the bulkhead and the sound-proofing on the inside, to remove heat and to reduce the risk of smoke and fire. I also bent some aluminium into a "sleeve" to wrap around the loom, to protect it from weld spits and grinding sparks.
In order to get the bottom edge flush so that the plug welds were solid, I had to use a long length of copper against the inner wing, and a crowbar to push the edge of the repair plate flush. So one hand pulled the crowbar from above, the other hand did the plug welds. Turned out pretty well, considering!
Re:
Posted: Sun Aug 28, 2011 6:30 pm
by Grrrmachine
And a final long strip to rejoin the inner wing to the bulkhead. Made of 1mm steel, it took me quite a few hours to bash and grind this thing to shape, but it went in eventually. I took the pictures half way through welding, while things were cooling down. It helps get your patience back when you've blown a few holes in the metal.

Showing how the inner wing abuts the scuttle

View from underneath. I did put plug welds in, but having read another thread about stitching all seams, I figured I'd take the opportunity to join these ones too, for extra strength.
The welds penetrated pretty well, but I welded both sides where I could, just to be on the safe side. The next step is to tidy up all the little holes I've left in the bulkhead, then I can chop out the rust around the suspension turret and put a new inner wing support on...

Re:
Posted: Tue Aug 30, 2011 1:51 pm
by djscottfree
Thanks GrrrMachine i wish you lived in the uk, anyone know the cost of a job like this ??
Re:
Posted: Tue Aug 30, 2011 3:37 pm
by Grrrmachine
For a job of this quality, I'd expect most people to pay a couple of pints and a bag of chips. But for a pro job, it's at least a full day's work if not two, so somewhere between 200-400 quid, and I'd expect seam sealer and paint included in that price.
That's why most cars get fragged as soon as they develop rust in this area.
Re:
Posted: Tue Aug 30, 2011 3:59 pm
by djscottfree
thanks

my car clean compared to yours but i do notice rot on the some of the seams around that area under scuttle vent on the passenger side on my car , i want to get it sorted before it end up as bad as yours but credit for saving her i wish i had the space otherwise i would be giving it go as well, good luck m8
Re:
Posted: Fri Sep 02, 2011 8:41 pm
by Grrrmachine
Today's progress involved cutting out the rust and preparing the replacement panel for the suspension turret.
However, the turret itself turned out to be fine, once the rusty layer of the inner wing was cut away.

On the E30, the turret comes down to a horizontal support plate, onto which the inner wing is spot welded.

All the old spot welds were ground off and chiselled away to make a smooth surface for the patch plate, which I scavenged from a donor vehicle. Well, not a whole vehicle, I bought a front quarter of a car for about 20quid, for precisely this purpose.

Then the plate was trimmed, filed and offered up until it lined up snuggly with the hole.

The downside of this is that chiselling the piece out of the donor introduced quite a few dents and bumps which will take some planishing to smooth out. On the upside, the donor was exactly the same colour as the car, and although the whole thing will get a paint job later anyway, it's just that little bit more satisfying.
Now the slow job of butt-welding the piece in, plus the plug-welds to hold it onto the suspension turret.
Posted: Sat Sep 03, 2011 5:19 pm
by Grrrmachine
The morning was spent with the wire brush attachment, getting the metal clean. I even had to use a chisel on the turret support to get the remnants of the old panel off, it was that bad. Still, with clean metal to weld to, the slow task of stitching took place

The metal was a bit bent from its removal from the old car, so the welding didn't go so smoothly, but by doubling the power and wire speed on the MIG the plug welds went in ok, scraping off the old underseal to check

The last thing to do to the inner wing was to make sure it was straight and strong. With no support panel for god knows how long, it had cracked in two places, around bolt holes, allowing it to distort. I didn't want to cut out any more of it, so I used the Displace Metal technique.

This involves tapping lots of little beads of metal into the panel, to melt out the thin stuff. Mig-weld is brittle, so this isn't advisable on structural areas, but this was just a few little patches. I clamped a length of copper to it to give me something to spill the weld over on to, then ground it all down.

I also had to let in another patch where the inner wing support was previously spot-welded. The metal there had worn thin too, but it was far too big and structurally important an area to risk using the Displace Metal technique. Stupidly, I forgot to file a semicircle out of the patch to complete the hole.

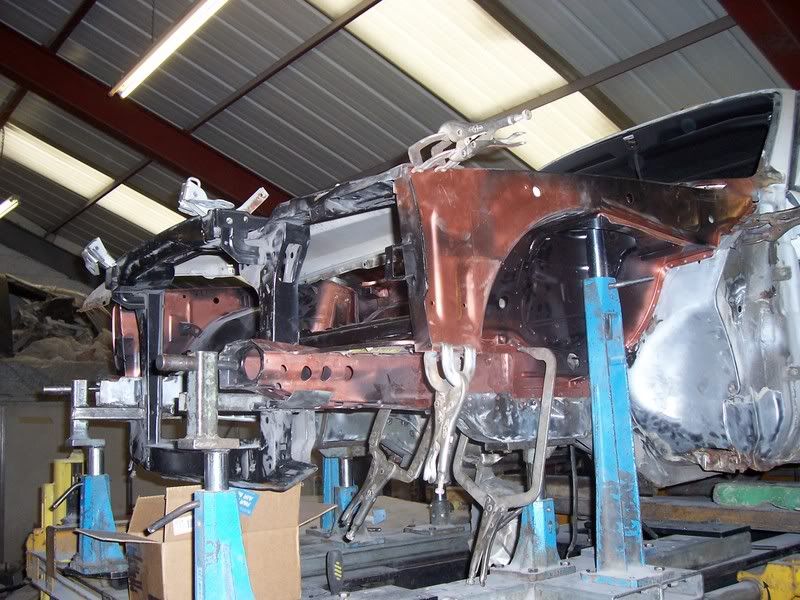
The next step will be to spot-weld on a new "flitch", or inner wing support, which I've already scavenged. Because of how these cars rust, I couldn't get a whole one (and I'm too poor to buy a whole new panel from BMW), but this gives you a perspective of Good Metal, Level of Rust and Rest of Car:

The final job will be to fabricate a "bridge" panel between the new flitch and the remains of the old one.