Battery In Boot
With the engine up front and the power at the back, E30s are known for being a bit tail-happy. To balance out the cars, especially the heavy-engined 325i, BMW tried to move as much weight as they could to the back end of the car, and located the Battery to the boot of the 325i as standard.
If you've increased the power of your car then every kilo at the back end helps. It's also particularly useful for ICE installations by moving the battery closer to any boot-mounted amplifiers you've chosen to fit.
Contents
Overview
The Battery In Boot installation removes the battery from its try under the Bonnet and fits it into the rear right pocket of the boot, behind the wheel arch. If you remove all the covering and carpet, you should see a solid metal mount at the bottom of that pocket, which is used to hold the battery in place, and all E30 shells will have the features in place to relocate the battery.
Once the battery itself is physically relocated, a thick cable is run the entire length of the car, along the right hand sill and under the carpet. This cable runs through the bulkhead (through a ready-made hole) to the engine bay, where it finishes as a dummy terminal. This terminal screws to the bulkhead, and allows the existing engine power cables to join to the new cable.
Parts
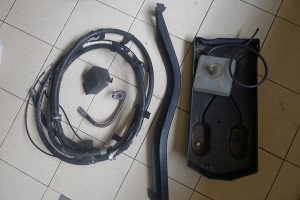
While the only essential part is the long cable, fitting the Full Kit will make your car neater and safer; do it once, do it properly.
- Front-to-Rear Power cable - thick
- Front-to-Rear Power cable - thin
- Earth cable
- Dummy Terminal
- Rear Arch Cable Sleeve
- Battery Tray
- Battery Breather tank
NOTE: We recommend the use of an E36 Front-to-Rear power cable if you can get hold of one. While the final terminal is different and may need adapting, the overall length of the cable is just a little bit longer, and makes fitting the cable that much easier.
IMPORTANT: Due to their increased length, Cabriolet cables are specific to that car. Normal Saloon cables are not long enough.
Fitting
We'll start at the engine end, so open your bonnet and get the existing Battery disconnected and out of the way.
What you're looking for is a small circular indentation on the inner wing. It'll be on the vertical part right next to the battery tray. Take a hammer, and lightly tap that area if you can't see it; you'll eventually find it and when you tap it lightly it should make the metal pop out. DO NOT confuse it with the oval cut-out higher up; this is for the air-conditioning pipework. By all means, use that hole if you want to, but your sealing grommet won't fit and you're at the risk of road noise and water leaks.
Feed a short amount of your Front-to-Rear cables through the hole. Don't force it all through, because we now need to move inside and strip out some of the Interior. On RHD cars the cables will come through under the steering wheel, but you'll need to unclip the shroud that covers the footwell to get to them. You'll also need to unscrew the speaker panel in the footwell and remove the sill trim so that you can lift up the carpets.
If you've not done it before, the sill trim is removed by pushing it horizontally towards the front of the car until it slides of its clip. If you try to prise it upwards, you'll just snap the plastic and you'll need a new trim piece, so do your best to push it forwards until you can see the REAR clip. Once that's exposed, pull the trim backwards again but over this rear clip, and keep tugging and lifting until it slides off its 5 locating clips. It's tough, but doable.
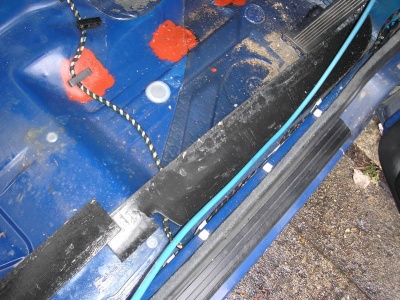
With the trim off and the carpets up, you'll be able to feed your cables into the recess in the sill with the rest of the loom, like so:
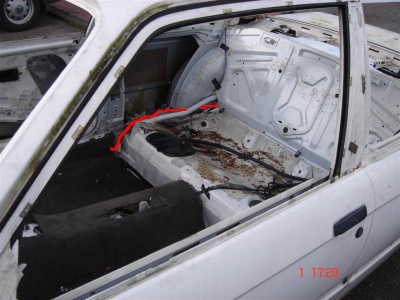
Go all the way along the sill, and up to the rear bench. Here, you'll need to lift up the rear seats, and also remove the side seat bolster (give it a good upwards tug and it'll just pop off). We've traced here the path that should get the cable into the boot for you:
Now that the power cables are in place, we need to prep the boot pocket. If you have it, the battery vent tank fits into the floor of the pocket, and then the battery tray is mounted on top. The tray itself should bolt into the existing metalwork, but it's not uncommon for some people to fabricate bolts, strengthening arms and other mounts to help carry and secure the load.
Once you're confident the battery will be secure, you need to figure out your earth cable. This all depends on the length of the earth cable you have; if it's long enough you should be able to go down and bolt it to the bumper mount (after cleaning up the area with a wire brush); if not, either drill into the side wall of the boot pocket, or weld on a new nut. Just make sure you have a solid, clean earth connection.
With the cables in place, you can clip on the cable protection sleeve around the wheel arch if you have it. If not, use cable ties to secure the cable firmly.
Then it's back to the engine bay to sort out the Dummy Terminal. The terminal should bolt to the bulkhead, just above where the existing engine loom goes through. Once it's solid you can attach all the existing engine wires to one side, and the new power cables to the other. The existing earth point on the suspension turret can stay for any accessories that need it, although you can remove the redundant battery earth cable.
Finally, return to the boot and plug in your battery. If everything's gone according to plan, your car should fire up as usual!


