DIY Smoked Hellas
Contents
Introduction
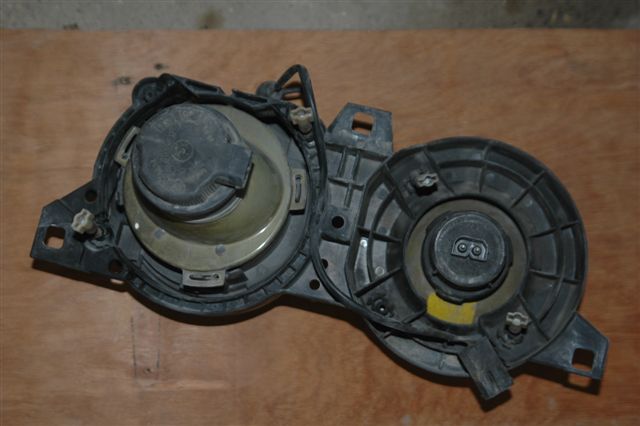
This is a basic idea of how to get yourself smoked Hella/Bosch lights for a very little amount of money (around a fiver), and around a weekend of messing about. My lights are Bosch units with a projector type main beam from a ‘92 cab, I think that some, if not all, older BMW’s (i.e. pre facelift) have slightly different driving lights that are not the projector type. I cannot tell you if this will work on them. My ’87 325 Sport is an American version that has fully sealed beams, alas American sealed beam type cannot be converted. The picture below shows the rear of my lights.
The first thing I must stress is if you want the finished results to look good you will have to take your time over it. If you start it on a Sunday afternoon you will balls it up if you need the car for work first thing Monday. Your first attempt (and hopefully your last) will take you around 6-8 hours and a night for paint drying. I am usually not the most patient of people and my handicraft skills are pretty poor although mechanically I am good, so if I can do it, so can you.
Tools and equipment
You will need a basic tool set, mainly consisting of screwdrivers. You will need a hot air gun of around 5kW, I used a Makita you can see the type in the pictures. You will need a hot glue gun. You will need some tin snips or if you can find one, a Dremel (or any very high speed drill with a cutting disk). You will need some 1 or 2 mm Aluminium, steel or tin sheet. You will need some Epoxy glue and some high temp silicone (I used gasket silicone happy to 600°). And finally a tin or two of heatproof black spray paint.
qcLJCe <a href="http://adsibtgpxskg.com/">adsibtgpxskg</a>, [url=http://aslwbzvbxnyv.com/]aslwbzvbxnyv[/url], [link=http://ezemuooccplx.com/]ezemuooccplx[/link], http://pjdcnfbqvhst.com/
http://www.perrysmusic.com/prada-white-fairy-m-bag.htm prada handbags 990 http://www.perrysmusic.com/chloe-patent-black-crocodile-paraty-tote.htm chloe tote pattern dprz http://www.perrysmusic.com/bottega-veneta-black-pocket-bag.htm bottega veneta bag 2078
Smoking the main (high) beam
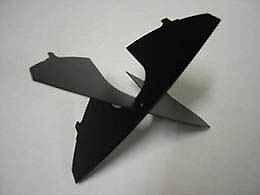
This bit is a little more tricky and even involves cutting and sticking! The idea is to make the interior of the light appear black but still allowing the mirror to direct 100% of the light foreword toward the road and rabbits. The driving light uses a projector system thus the reflector you have painted black has little effect, but the high beam uses a bulb, concentrated and directed by a mirrored reflector, thus it’s reflector cannot be sprayed black. Those of you who have already done so (as you are confused which is high beam and driving lights) can also go down to the scrappies as you have f*@%ed your main beam and now need a new one! The trick is to fool happy passers by (and non-E30zoners) into seeing a black reflector, this clever trick accomplished by inserting what I call a thingy. The thingy is a black piece of plastic or metal shaped in a 3D cross that sits in your main beam reflector, perpendicular to the angle of the mirror, and splitting the reflector into four quarters (What???). The thingy (well the mirror really) reflects its black colour around the reflector bowl and hey presto it appears black from certain angles! Its extremely hard to explain this shape so look at the pictures to the right.
I could not buy one of these thingies so I made one myself. Sorry no pattern as I stuck it together before I had chance (mine also modified to accept angel eyes). I experimented with cardboard and scissors until I found the shape of the reflector bowl, I then used a piece of 2mm galvanised steel sheet and cut the shapes out with the tin snips and finished with a high speed cutting drill (a Dremel). It will take a bit of messing around but what to do! Once you are happy with the shape of your thingy glue it together with epoxy glue and leave to set. Then spray it black. Again take your time spraying and the results will pay off. I sprayed my thingies, let them dry, then popped ‘em in the oven for an hour at 70-80° and baked them to fully harden the paint.
For those with pre-face lift, non-projector, lights you could probably repeat this process for the driving lights as I think they use a similar bulb and mirrored reflector system. Let me (or others really) know.
The Final Assembly Bit
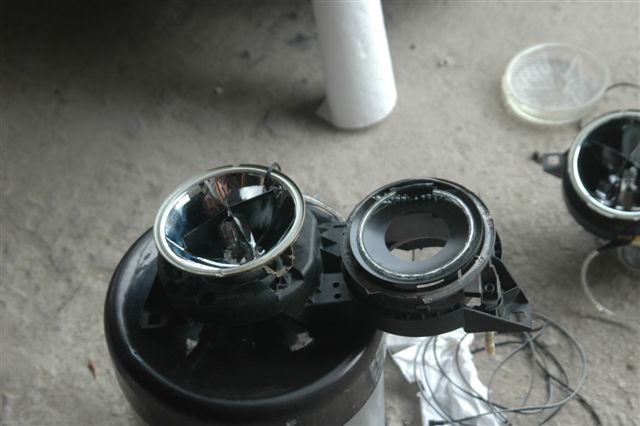
I really hope you have got this far with your eyes, house in tact, and a lovely black pair of hot thingies. Now stick the driving light reflector back into the holder and secure it with a drop of hot glue. Next take some heat proof silicone (or silicone ‘gasket in a tube’ good to 600°) and stick your thingy into its final position inside the high beam reflector. I stuck mine at 45° to the road because of my angel eyes, but note that the real things are parallel to the road, try a mock up and play around before sticking it in its final position. A tip is to glue the underneath so it will not be visible from the top where, unless you run people over frequently, no one should see the glue.
Now clean the reflectors (and glass lenses too) and stick the glass lenses back onto their backings using a hot glue gun. Make sure they are the right way up and that the driving light lens is not on the main beam backing. I would suggest several mock ups before final assembly, I couldn’t resist mocking it up at each stage to see how wicked they looked! Do the same. I would also clean the halogen bulbs with a tissue and cleaning alcohol as your greasy mitts would have probably touched them, which will cause hot spots and burnt out bulbs.
It is possible to re-use the old glue by simply heating it back up with the heat gun and pushing the lenses back on. Personally I don’t like this idea as I am sure it will compromise the weather proofing of the lens, as I live in sunny Bahrain and drive a cab they never get wet, but for the majority of you who are in U.K. this will be an issue. It seems a waste of time to do a good job then skimp on the little things. Most garages will have one so go and ask if you can borrow, if you don’t, then expect water inside your lights and blown bulbs in winter.
c8l1FT <a href="http://fcrkdqdeodry.com/">fcrkdqdeodry</a>, [url=http://sbquprmirzpd.com/]sbquprmirzpd[/url], [link=http://lhmnacjzlwjq.com/]lhmnacjzlwjq[/link], http://kolkvnacwhpw.com/


