Difference between revisions of "Adjusting Cab rear windows"
Grrrmachine (talk | contribs) |
Grrrmachine (talk | contribs) m |
||
| Line 29: | Line 29: | ||
[[Category: Technical]] | [[Category: Technical]] | ||
| − | [[Category: | + | [[Category: Repair]] |
[[Category: Cabriolet]] | [[Category: Cabriolet]] | ||
[[Category: Windows]] | [[Category: Windows]] | ||
Latest revision as of 08:20, 11 May 2012
The regulator unit has a front and rear track and an electric motor all attached. After disconnecting the motor plug and removing four bolts it can be lifted out of the car. You would need to do this if replacing the window glass. More on this later.
To adjust rear side window :
The adjustments are all made with star bolts that are held in place via 13mm lock nuts. You need a male star driver (maybe #15 - don't quote me, you should at least have a cheapo $9 star socket/driver Perfectly suitable for adjustment type stuff). Height adjustment. At the top of each track is a stop nut that can be used to limit the upper travel of the window. (These are arrowed in the picture below). Minor front vs. rear adjustment here might also keep the rear glass parallel with the door glass.
Centering adjustment. In order to center the glass in the body cavity so that it lines up with the door glass there are two locking star bolts towards the top of the regulator. They are accessible through view holes and actually move the entire regulator unit in (towards the seats) or out(towards the street). One is hidden behind the upper seatbelt but, knowing what to look for you should find each of these with no problem. (These adjustment bolts are circled in the picture below).
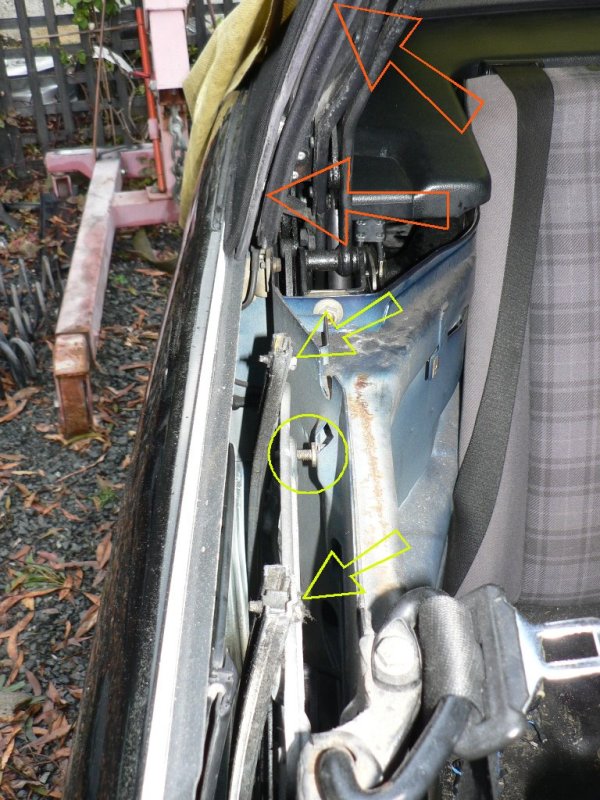
Another angle shot shows the window channel (arrowed in orange) that you need to get the glass to run in by adjusting the bolts (yellow arrow) and sit properly height wise and some angle wise by adjusting the bolts circled in yellow.
Angle adjustment. Once your glass is centered in its track correctly you need to match the door window's angle. i.e. the window bottoms meet because of the centering adjustment that you just did in the previous step. Now you have to adjust the rear window angle so that the tops are in the same plane as well. There is a third star adjusting bolt for this. When the window is fully up, you can look through a view hole and see this adjuster at the bottom of the pane of glass. This adjustment is not intuitive which explains why the glass shop that replaced this window for a PO snapped it off. This in turn caused a perpetual rattle and other head aches. To adjust - Back off on the 13mm lock nut. Turn the adjusting bolt clockwise to pull the glass bottom to you and push the top out. Counter clockwise pushes the bottom out and the top in. You don't really see the effects until you tighten up on the locknut which brings everything home. (refer to the pic below, the adjusting bolt is arrowed. This is on the passenger side just in front of the lower anchor point for the rear seat belt).
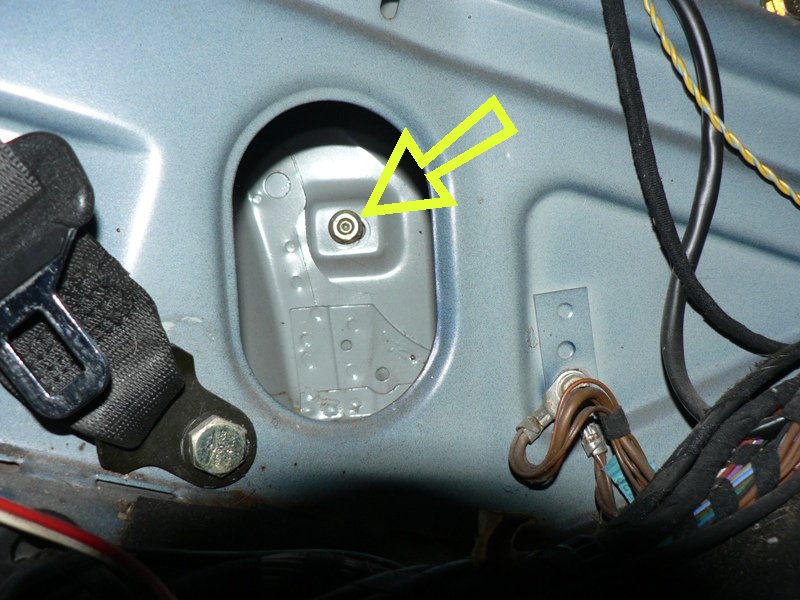
Finally, if for some reason you need to remove the entire regulator it is fairly straight forward (once someone tells you how!). I needed to do this as my problem was caused by that third adjusting bolt which turned out to be snapped. The top two bolts securing the regulator are the two adjusters that centred the regulator in the body cavity. The lower two are not as intuitive. The lower front one is well hidden behind the lower seatbelt spool. It is not the one securing the spool but it is about two inches away to the front. (refer to the bolt arrowed in the picture below). The last one is a little lower and to the rear.(refer to adjusting bolt arrowed in pic above). It is accessible through a small view hole and is another one of those star adjusting bolts. If removing the regulator, you must raise the window all the way to the top and unplug the motor. Everything lifts out as a unit.
this article was copied from bmwe30ic newsgroup Pictures and some text added by willnz for more clarity. >


