Difference between revisions of "Z3 short shifter conversion"
| Line 6: | Line 6: | ||
You will need to source 2nd hand window assemblies, make sure you get the window/body seals too, if your removing them from a wrecked car yourself see if you can also get hold of the body nuts that the closure mechanism screws to on the C pillar. (BMW part number 07.12.9.925.735 Qty 4 off) | You will need to source 2nd hand window assemblies, make sure you get the window/body seals too, if your removing them from a wrecked car yourself see if you can also get hold of the body nuts that the closure mechanism screws to on the C pillar. (BMW part number 07.12.9.925.735 Qty 4 off) | ||
| − | |||
| − | |||
| − | |||
| − | |||
| − | |||
| − | |||
| − | |||
| − | |||
| − | |||
| − | |||
| − | |||
| − | |||
== Parts Required == | == Parts Required == | ||
Revision as of 13:21, 6 January 2009
Introduction
Fitting opening rear ¼ windows turned out to be a fairly easy job!
Takes approx 1/2hour per side
You will need to source 2nd hand window assemblies, make sure you get the window/body seals too, if your removing them from a wrecked car yourself see if you can also get hold of the body nuts that the closure mechanism screws to on the C pillar. (BMW part number 07.12.9.925.735 Qty 4 off)
Parts Required
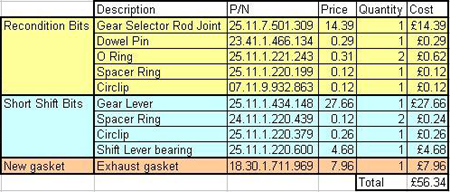
PLEASE NOTE: The Gear Lever is now part number - 25117527252
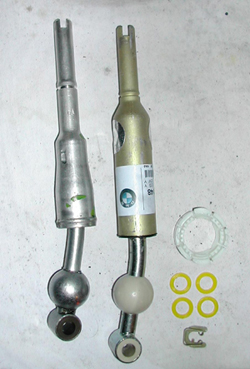
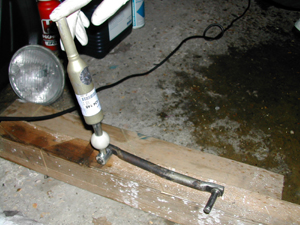
The only parts that you actually need for the conversion are the ones highlighted in blue. The remainder of the parts are required if you plan to change the selector rod bush which will not be covered in this write-up as it's a good 8 hours work and much more involved than simply swapping the shifter. Here is a picture of the parts required... you can see the difference in the E30 and Z3 levers. The Z3 lever is the one on the right. The shorter throw is gained by the much greater distance between the ball joint and the selector rod joint.
Procedure
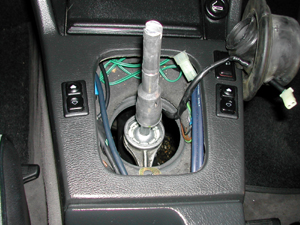
Make a start by jacking the car up and securely supporting it on axle stands at the front. First up, get in the vehicle and remove your gear shift knob. If you have an original BMW knob, it should pull straight off with a bit of force. If you have an aftermarket knob, then check with the manufacturer for removal instructions. Now remove the gear shift gaiter, this should unclip at the base and lift off. Beneath the gaiter you will see a large round rubber grommet unclip the reverse light switch and remove the grommet, it will just pull free. You should now be able to see the floor beneath your car through the hole and it should look something like the picture below.
Next you need to remove the old shifter. Get underneath the car and you will be able to see the selector rod attached to the bottom of the gear shift. The selector rod is held on by a circlip on each end. Use a screw driver to pry the old circlips off and then slide the selector rod out. Make sure you remember which way it comes out as it will only go back in one way!!!
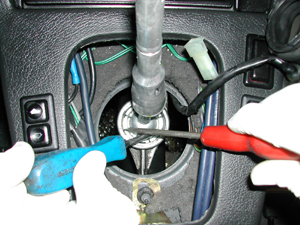
Once the selector rod has been removed, get back inside the car to remove the old shifter. Use two screw drivers against each other to force the locking ring round to release it. You will see in the metal housing that it sits into, a couple of locating recesses, rotate the locking ring until the fat tabs of the locking ring line up with the recesses and then pull the shift lever straight up. It should come free but be careful not to hit yourself in the face with it. You can see from the picture below the double screw driver method used to unlock the locking ring.
Now we are halfway there. Take the new Z3 shifter and lubricate the ball joint with a dab of silicone grease. Also lubricate the new locking ring and then slide the locking ring over the bottom of the Z3 shifter and clip it into place over the ball joint. You should now be able to clip the new lever back into place and lock the plastic locking ring the opposite to how you removed it.
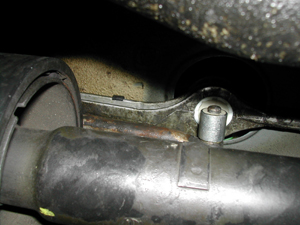
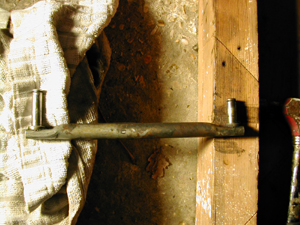
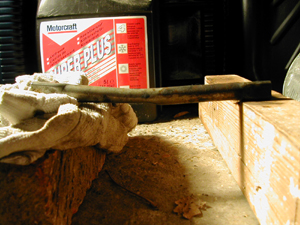
Next the selector rod needs some careful modification. We need to place a slight bend in the selector rod so that it clears the vibration damper on the prop shaft. This is caused by the extra length of the new Z3 shift lever below the ball joint. The best way to do this is to place it in a vice. As we didn't have a vice to hand, we made good use of a hammer. Place the selector rod between two supports and give it a few sharp hits with a hammer. It should look something like this.
Refit the selector rod beneath the car and replace the yellow spacer rings and circlips. Get someone to change the gears inside the car while you check underneath for clearance of the vibration damper. If the selector rod touches the vibration damper then remove it and bend slightly further.
Once everything is checked and the selector rod has been replaced, you can refit the rubber grommet, gaiter and shift knob.
Now take your car for a spin to test out your fantastic new short-shift!
Written by E30Adam and copyright to www.e30zone.co.uk
