Difference between revisions of "Windscreen Wiper faults"
m (→Originally Written & Photographed by Peter Laing (PeteE30tourer)) |
|||
| Line 5: | Line 5: | ||
'''Step 1 – Remove air-vent panel''' | '''Step 1 – Remove air-vent panel''' | ||
| − | You need to | + | You need to pry off the plastic air-vent on the passenger side, just below the wind-screen on the scuttle panel with a flat-blade screwdriver. Be sure to use a bit of wood to lever against to save your paint-work or windscreen. There are three clips along the top and bottom edges of this plastic panel as shown below (looking down from the windscreen). |
[[Image:Wiper1.jpg]] | [[Image:Wiper1.jpg]] | ||
| Line 19: | Line 19: | ||
[[Image:Wiper3.jpg]] | [[Image:Wiper3.jpg]] | ||
| − | To make life easier later on, mark the position of the mechanism so you can be sure to put it back exactly in the same spot. I used a sharp knife to score a line on the motor mounting bracket parallel to the arm. Remove the single nut from the top of the motor shaft and | + | To make life easier later on, mark the position of the mechanism so you can be sure to put it back exactly in the same spot. I used a sharp knife to score a line on the motor mounting bracket parallel to the arm. Remove the single nut from the top of the motor shaft and pry off the mechanism. Move it out of the way. |
'''Step 3 – Disconnect the electrics''' | '''Step 3 – Disconnect the electrics''' | ||
There is an in-line connector mounted on the side of the motor bracket – towards the driver’s side – see photo below. | There is an in-line connector mounted on the side of the motor bracket – towards the driver’s side – see photo below. | ||
| Line 33: | Line 33: | ||
[[Image:Wiper5.jpg]] | [[Image:Wiper5.jpg]] | ||
| − | Now remove the two larger bolts that hold the bracket to the bulkhead of the car. There is, however, a third bolt holding this bracket on, which can’t be seen nor accessed through the air-vent. To get to this, and to aid removal of the motor, you need to | + | Now remove the two larger bolts that hold the bracket to the bulkhead of the car. There is, however, a third bolt holding this bracket on, which can’t be seen nor accessed through the air-vent. To get to this, and to aid removal of the motor, you need to pry away the sound-deadening panel at the very back of the engine bay as shown in the photo below. On mine, this required removing one small bolt (Fixing A in photo) and the two that hold the large, round multi-way connector bracket (Fixings B in photo). You’ll also have to pull away the rubber seal strip along the top edge before pulling away this panel. |
[[Image:Wiper6.jpg]] | [[Image:Wiper6.jpg]] | ||
| Line 49: | Line 49: | ||
[[Image:Wiper8.jpg]] | [[Image:Wiper8.jpg]] | ||
| − | You can | + | You can pry off these four clips to enable removal of this plastic cover, then you’ll have something looking like this: |
[[Image:Wiper9.jpg]] | [[Image:Wiper9.jpg]] | ||
Revision as of 13:01, 24 December 2008
Potential Cure For Stuttering Windscreen Wipers On Intermittent Setting
Originally Written & Photographed by Peter Laing (PeteE30tourer)
One of the most annoying “features” of my cherished E30 is that the wipers barely manage to stutter across the screen when on the intermittent or single wipe settings, even though they work fine on normal or fast modes. Having read several posts on the E30zone forums from others with the same problems, it’s obvious that this is a common problem. I’d read about a possible cure for this in the responses on the forum, so thought I’d give it a go and take a few photos in the process to share it with others. So, here’s what I did.
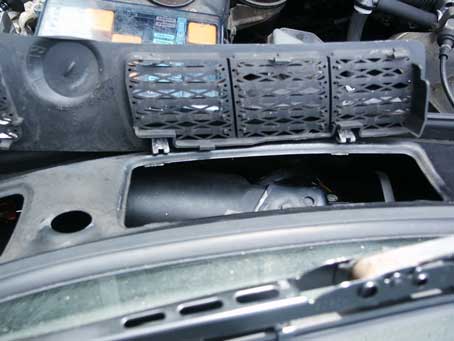
Step 1 – Remove air-vent panel You need to pry off the plastic air-vent on the passenger side, just below the wind-screen on the scuttle panel with a flat-blade screwdriver. Be sure to use a bit of wood to lever against to save your paint-work or windscreen. There are three clips along the top and bottom edges of this plastic panel as shown below (looking down from the windscreen).
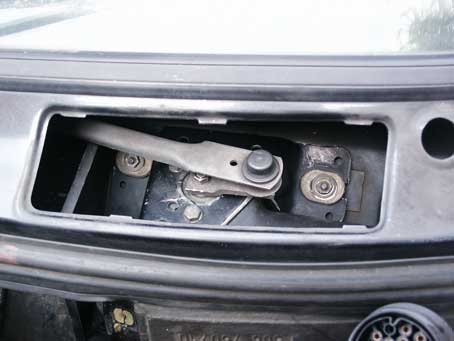
You’ll then be able to see the wiper motor and the mechanism that moves both wipers, as shown below:
Step 2 – Remove the Wiper Mechanism
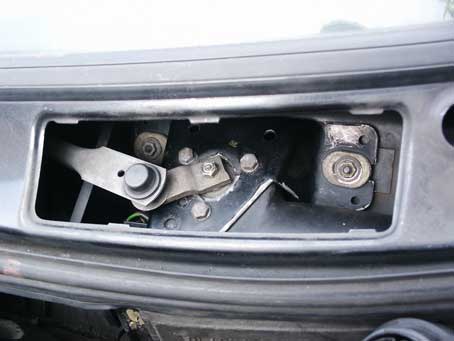
First thing you’ll note is that the nut holding on the wiper mechanism isn’t easily accessible, so, get in the car, turn on the ignition and set the wipers wiping, but turn off the ignition as they get to the vertical position, thus stopping them there. The motor/mechanism will now look something like this:
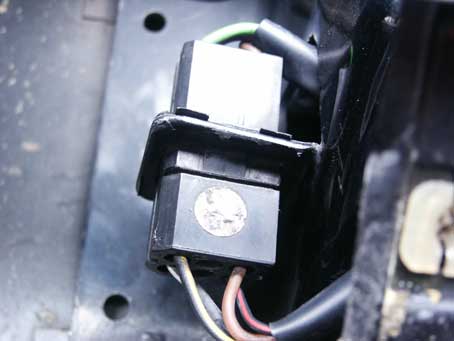
To make life easier later on, mark the position of the mechanism so you can be sure to put it back exactly in the same spot. I used a sharp knife to score a line on the motor mounting bracket parallel to the arm. Remove the single nut from the top of the motor shaft and pry off the mechanism. Move it out of the way. Step 3 – Disconnect the electrics There is an in-line connector mounted on the side of the motor bracket – towards the driver’s side – see photo below.
I found it tricky to separate this connector until I realised how it works. It’s the bottom half that comes away, leaving the top half, which is the one connected to the motor, on the bracket. This top half can then be pulled off the bracket.
Step 4 – Removing the motor
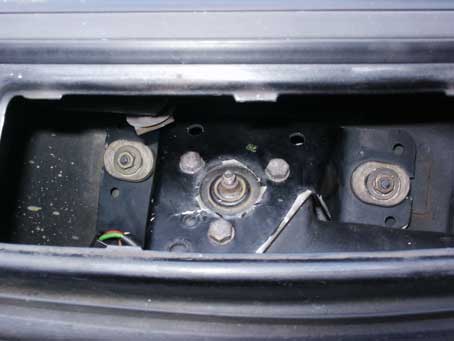
To remove the motor, you need to first undo the three smaller bolts around the motor shaft, which secure the motor to the bracket as shown below.
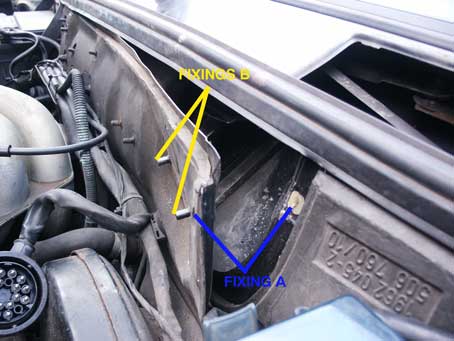
Now remove the two larger bolts that hold the bracket to the bulkhead of the car. There is, however, a third bolt holding this bracket on, which can’t be seen nor accessed through the air-vent. To get to this, and to aid removal of the motor, you need to pry away the sound-deadening panel at the very back of the engine bay as shown in the photo below. On mine, this required removing one small bolt (Fixing A in photo) and the two that hold the large, round multi-way connector bracket (Fixings B in photo). You’ll also have to pull away the rubber seal strip along the top edge before pulling away this panel.
Now you’ll see and be able to remove the third bolt holding on the motor bracket. Next you have to basically waggle around the motor and bracket within the very tight area until you can pull out the motor from the gap you’ve created by pulling away the panel above. No matter how I tried, I couldn’t get the motor out through the air-vent hole.
Step 5 – Inspecting and cleaning the motor
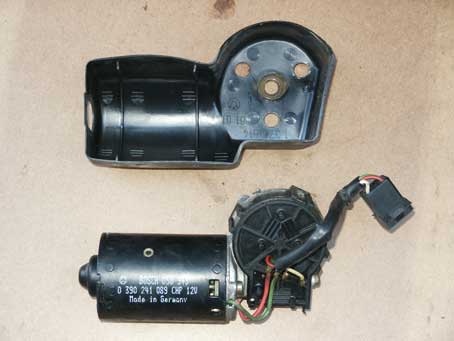
Now you’ve got the motor out, you can remove the plastic cover and end up with something looking like this:
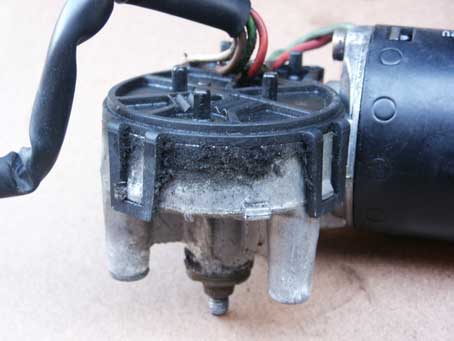
The main black barrel is the motor itself and the round part on the end is what detects where the wipers should park. It’s this latter part that can cause the problem with stuttering wipers. You’ll see that there is a black plastic cover which is clipped onto this round part, as shown below:
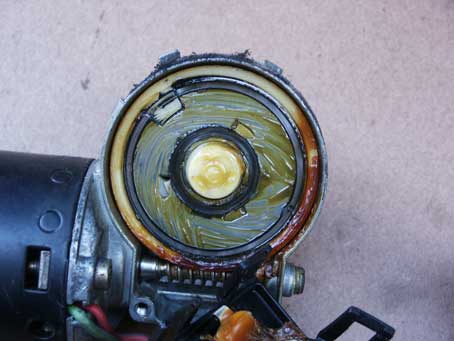
You can pry off these four clips to enable removal of this plastic cover, then you’ll have something looking like this:
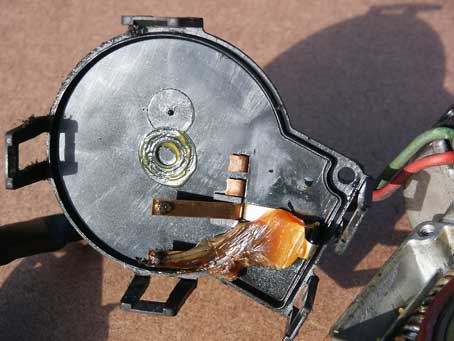
A right greasy, dirty mess!! Considering most of these E30’s have gone through nearly 20 wet British winters and 20 dusty summers, with considerable use of the wipers throughout, it’s hardly surprising things get as dirty as this. The electrical wipers on the inside of the plastic cover were also in quite a state, as shown below:
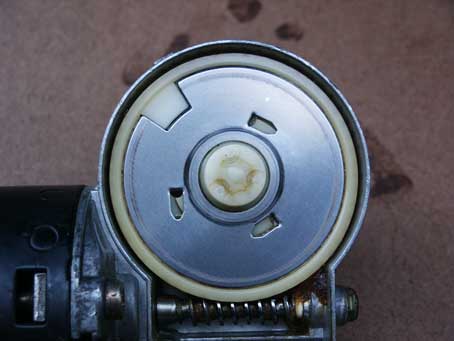
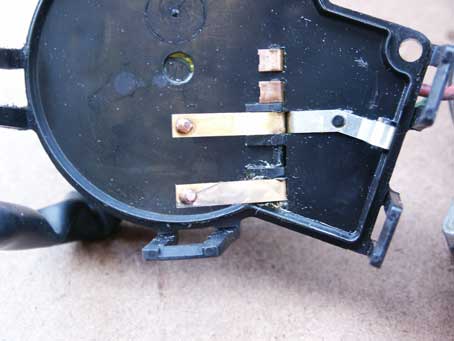
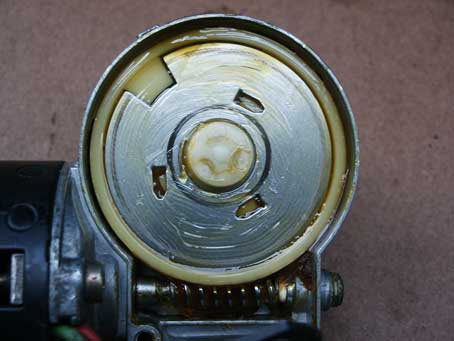
So, time to clean things up. I started with just tissue to completely remove all the old grease, then some light contact cleaner to finish off the job, being careful not to remove any of the grease from the worm-gear, resulting in the following:
Quite a transformation! Next, you have to grease it up again. LM grease will do the job just fine but I managed to salvage a large blob of relatively clean grease from the contacts (see earlier photo) and spread it all over the metal disk and contacts as shown below:
By the way, I believe the notch on the outer edge of this metal disk is what stops the motor with the wipers in the parked position. The two contacts on the plastic cover are for the constant and intermittent/ park settings respectively – one makes constant electrical connection with this plate (on the inner circle) and one circles the outside and breaks contact when it gets to the notch.
Step 6 – Putting it all back together
Basically, you need to do everything from Step 4 backwards as follows:
- Clip the plastic cover back on the round section of the wiper motor
- Put the overall plastic cover back on the motor
- Put the motor back in the compartment
- Bolt it to the bracket with the three smaller bolts
- Bolt the bracket back to the bulkhead with the three larger bolts (Note that these have elongated holes to allow some lateral adjustment – try to get them back in the original positions to avoid upsetting the mechanism in any way.)
- Reconnect the connector (good opportunity to use some contact cleaner!)
- Put back the sound-deadening panel
- Reconnect the wiper mechanism in the same position as it was taken off
- Turn on the ignition and check the wipers park correctly – if not see below
If your wipers don’t park in the correct position, as mine didn’t despite my earlier preventative measures, you just need a bit of trial and error in fitting the wiper mechanism in different positions on the motor shaft until it comes right.
When trying out my wipers in intermittent mode, they were slightly better, but not as much of an improvement as I had expected. However, I considered the electrical wipers within the motor would need time to “bed-in” through the grease, so I ran the windscreen wipers on full speed for a while, then on intermittent for a while and eventually all came good – perfectly smooth operation!! I’ve no idea how much a new motor would cost, but I’m well pleased I saved myself that expense. The total job took me about 2 hours, but if I’d known what I know now about what had to be done and in what order, and didn’t keep stopping to take photos, I reckon it could have been done in about an hour or maybe less. One word of warning though – I ended up with hands cut to shreds due to fighting with the motor through the tiny access holes beneath the air-vent! Further tips I can thoroughly recommend some decent quality wipers – I bought some Bosch ones from Halfords for about £18 before embarking on cleaning the motor and they alone improved matters. Also, try Rain-X (or similar product) on your windscreen as it helps to a.) keep the rain off your windscreen and b.) ease the path of the wipers so the motor has less work to do. It costs a few quid, but lasts for ages if applied correctly.
