Difference between revisions of "Remove the Sunroof"
Grrrmachine (talk | contribs) (New page: Whether you just need to adjust the sunroof or you want to remove the entire panel, here's a step by step approach to getting the metal part moving. __TOC__ =Tools= *T25 Torx screwdriver ...) |
Grrrmachine (talk | contribs) m |
||
| Line 41: | Line 41: | ||
[[Image:sunroof09.jpg|center|400px]] | [[Image:sunroof09.jpg|center|400px]] | ||
| + | |||
| + | [[Category: Technical]] | ||
| + | [[Category: Bodywork]] | ||
| + | [[Category: Repair]] | ||
Latest revision as of 07:50, 12 May 2012
Whether you just need to adjust the sunroof or you want to remove the entire panel, here's a step by step approach to getting the metal part moving.
Contents
Tools
- T25 Torx screwdriver with flexible attachment
- Trim panel puller wrapped in a towel or equivalent (wood spoon)
- 4mm hex keys
Removal
Open the sunroof halfway and use the towel-wrapped door panel puller to carefully pry down the (5) body fasteners. Use the pictures below to pry as close as possible to the fasteners.
Close the sunroof and continue cranking (or closing if motorised) until the sunroof is tilted open at the rear. Carefully push the inner lining back until the back portion drops, then continue pushing and guiding it backwards as far as it will go into the roof line.
Now use the T25 Torx screwdriver to loosen the six screws holding the sunroof to the guide track. They are only supposed to be tightened to 3 to 4 ft-lb, but mine took some effort to break loose probably due to oxidation. The flexible attachment screwdriver is useful here to get enough clearance to turn it properly. Lower the sunroof down to the standard closed position in preparation for the next step.
The final step is to get the plastic guide feet off the tilt track. They should simply lift off, but be careful; violent force will bend or break the track, and then you're properly screwed. Once the feet are off, the panel should simply lift out.
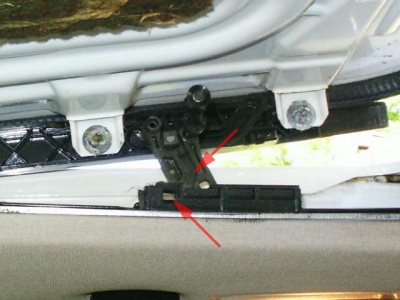
If you're adjusting the panel, the Bentley manual talks about placing 4mm hex wrenches through holes in the guide rail (bottom arrow) to slide through and engage the tilt track (top arrow) on both sides, thereby keeping the sunroof sliding mechanism held solidly together during the adjustment process. Strangely enough, I couldn't see any way the hole would match up with the track when the sunroof was closed. I closed the sunroof and stuck the hex wrenches in there, but doubt it engaged anything useful. Maybe my sunroof mechanism is a bit different?
Refitting
Fit the replacement sunroof panel into the cranking mechanism guides exactly where the old one was. Line up the holes where the torx bolts are supposed to go. Loosely thread the torx bolts back into the holes by hand. Remember to do it in this order: middle bolts first, then front ones, lastly the rear ones.
Adjustment
With the sunroof in the standard closed position, have a second person hold the rear edge 1mm above the roofline while you tighten the back screw and repeat for the other side. During this process, I held the mechanism down with my fingertips from the inside, trying to mimic the purpose of the 4mm hex wrench described in Step 4. Hold the front edge 1mm below the roofline and tighten the front and middle screws. All six screws should be tightened to 3 to 4 ft-lb.
Then use the crank or motor to tilt the sunroof upwards and pull the inner lining back out to the fully closed position. It took me a number of tries, but close the sunroof and continue to retract it to the halfway point while holding and guiding the liner fasteners into place. It's a little tricky, but take your time and you'll eventually get it lined up properly.
Reinstall the sunroof inner lining. First crank the sunroof to the forward position. Slide the inner roof lining out and connect the rear part first. Pull it up and out towards the rear of the car and then slide the grooves on the lining piece over the rollers on each side of the sunroof cranking mechanism.
And lastly, push the trim clips along the front of the inner lining up into the corresponding holes at the front of the sunroof panel.


